Basics
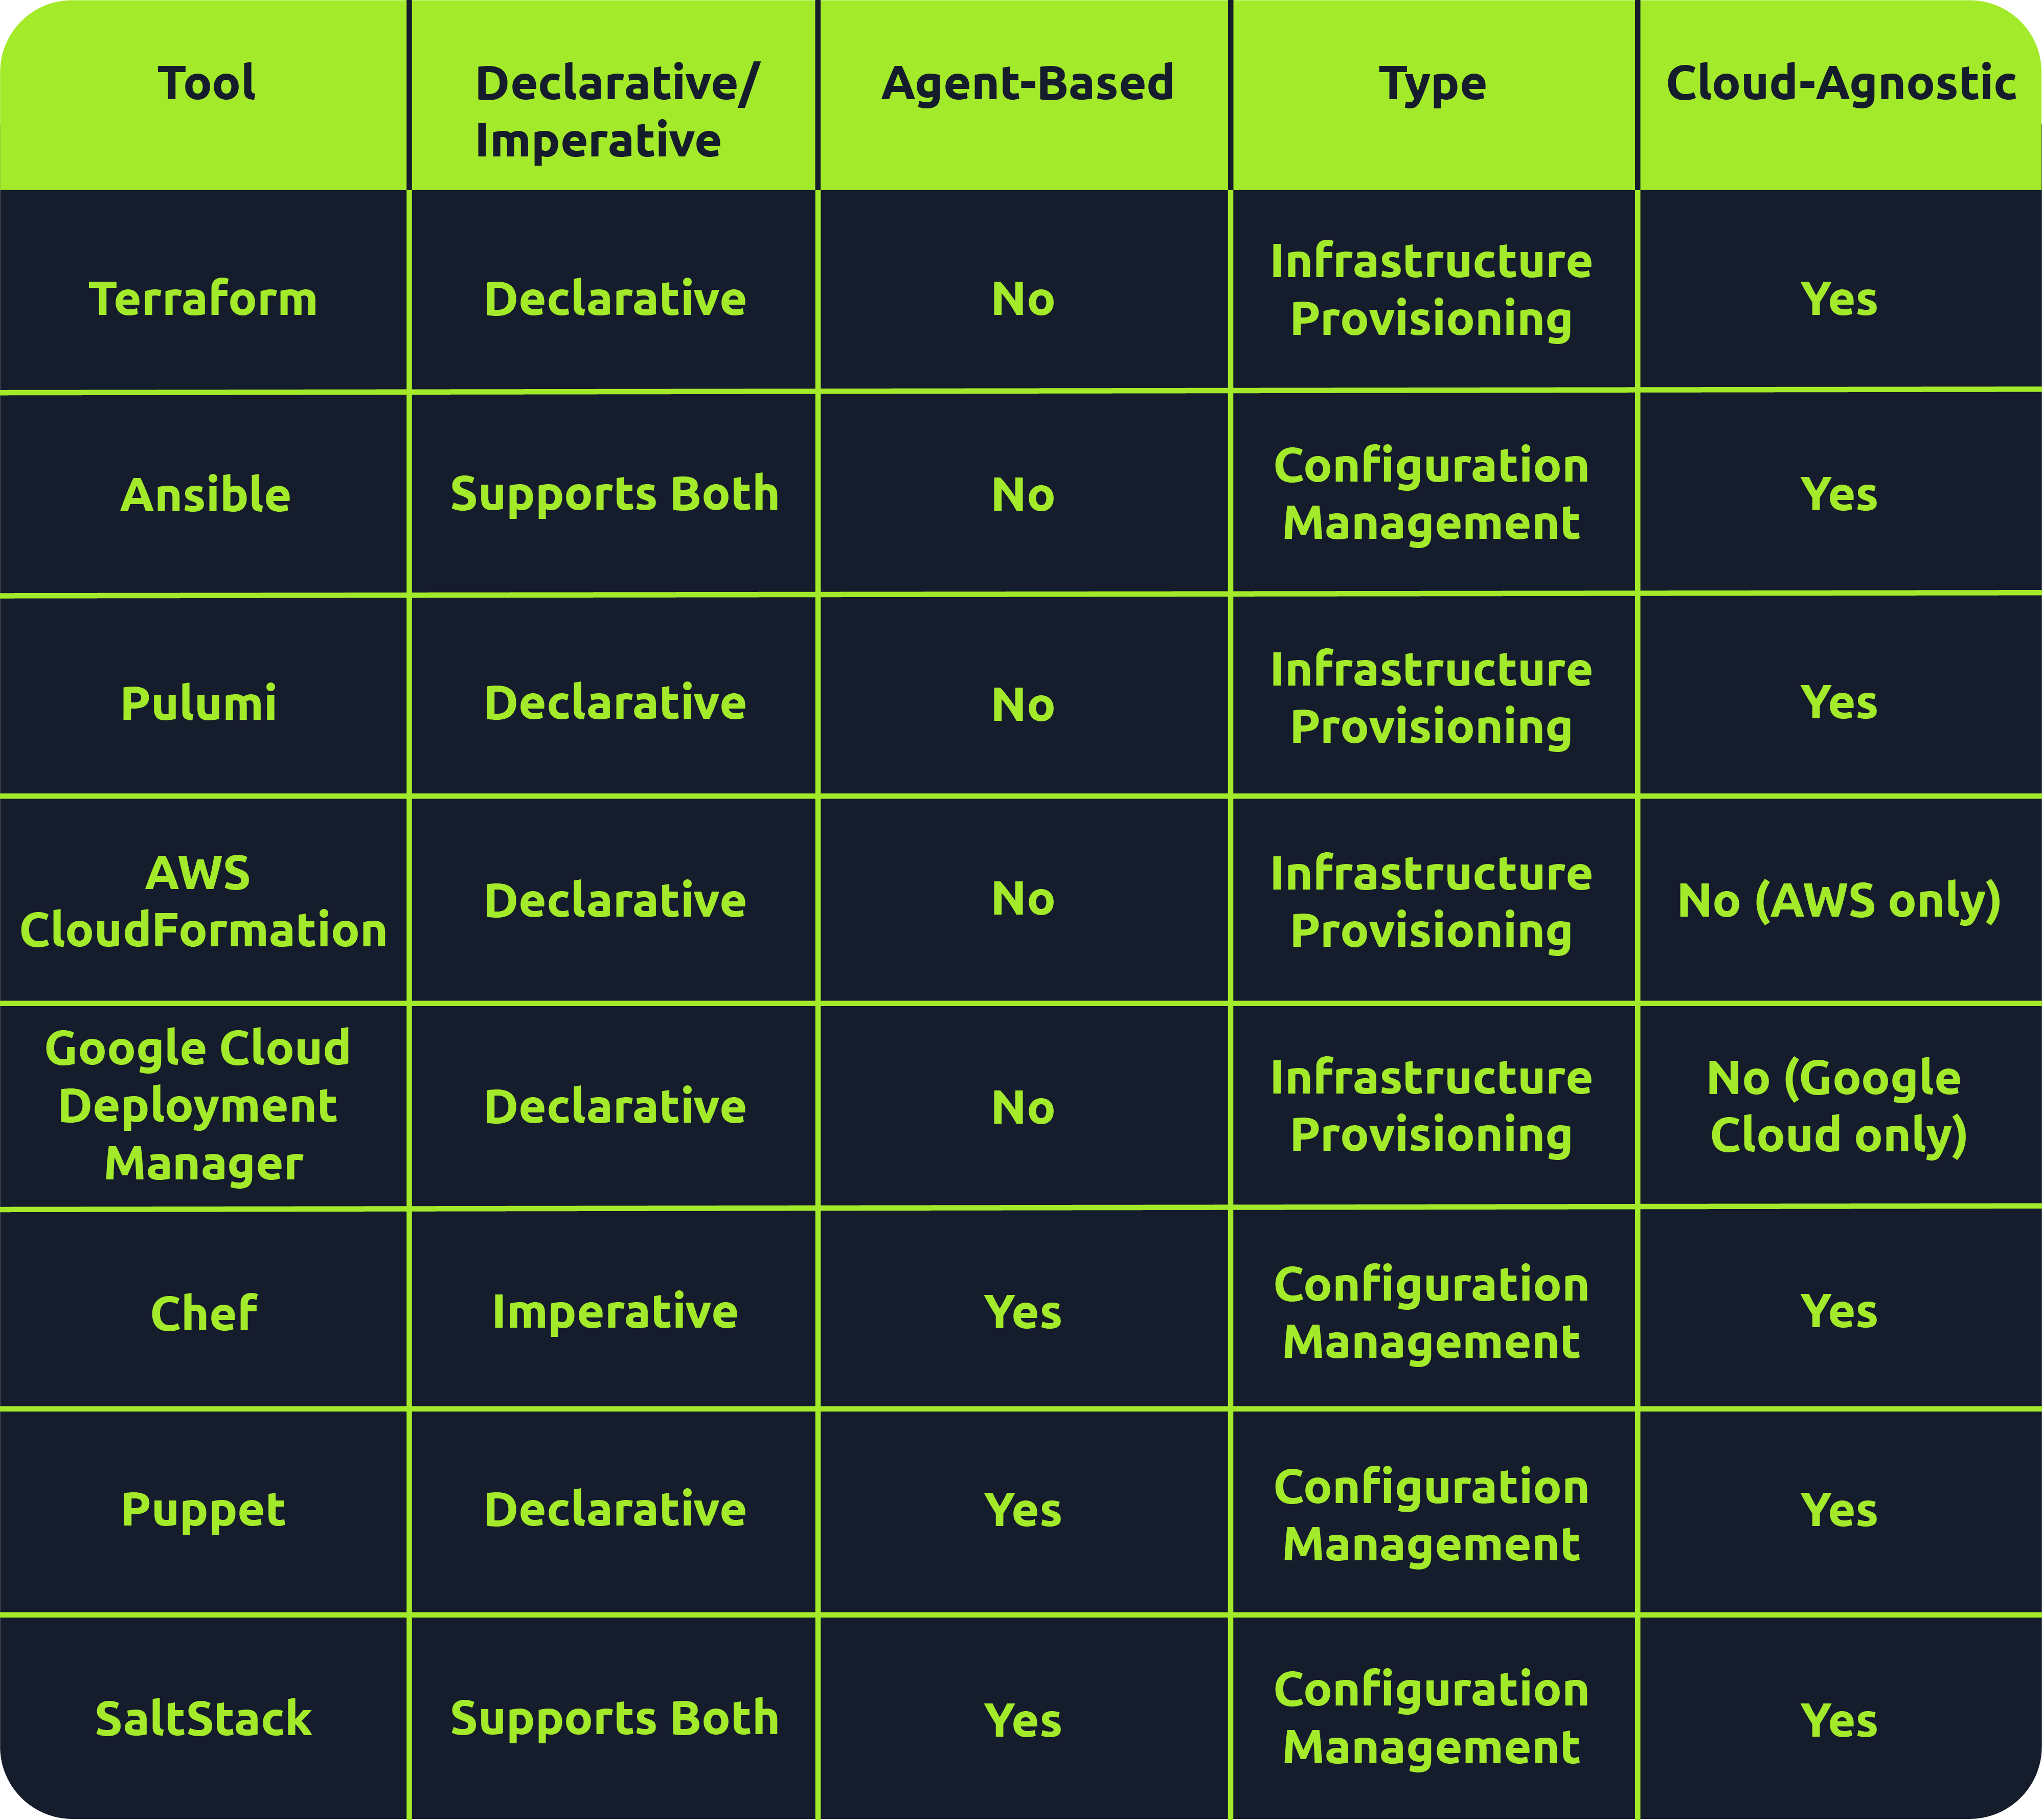
Many tools fall under the IaC umbrella, including Terraform, AWS CloudFormation, Google Cloud Deployment Manager, Ansible, Puppet, Chef, SaltStack and Pulumi. There are both declarative and imperative (also known as functional and procedural) IaC tools:
- Declarative: An explicit desired state for your infrastructure, min/max resources, x components, etc.; the IaC tool will perform actions based on what is defined.
- Ex: Terraform, AWS CloudFormation, Pulumi and Puppet (Ansible also supports declarative)
- More straightforward approach that is easier to manage, especially for long-term infrastructure
- Imperative: Defining specific commands to be run to achieve the desired state; these commands need to be executed in a particular order.
- Ex: Chef though SaltStack and Ansible both support imperative too
- More flexible, giving the user more control and allowing them to specify exactly how the infrastructure is provisioned/managed
Agent-based vs. Agentless
- Agent-based: “Agent”is installed on the server that is to be managed. It acts as a communication channel between the IaC tool and the resources that need managing.
- Good for automation
- Ex: Puppet, Chef, and Saltstack
- Agentless: These tools leverage existing communication protocols like SSH, WinRM or Cloud APIs to interact with and provision resources on the target system.
- Simplicity during setup
- Faster and easier to deploy across environments
- Less maintenance and no risks surrounding the securing of an agent
- l=But less control over target systems than agent-based tools
- Terraform, AWS CloudFormation, Pulumi and Ansible
Immutable vs. Mutable
- Mutable: You can make changes to that infrastructure in place, such as upgrading applications that are already in place.
- Can be an issue because no longer version 1 anymore but not quite version 2 either
- Immutable: Once an infrastructure has been provisioned, that’s how it will be until it’s destroyed.
- Allows for consistency across servers
- This approach has some drawbacks, as having multiple infrastructures stood up side by side or retrying on failed attempts is more resource-intensive than simply updating in place
- Ex: Terraform, AWS CloudFormation, Google Cloud Deployment Manager, Pulumi
Provisioning vs. Configuration Management
Overall there are 4 key tasks:
- Infrastructure provisioning (the set-up of the infrastructure)
- Infrastructure management (changes made to infrastructure)
- Software installation (initial installation and configuration of software/applications)
- Software management (updates made to software or config changes)
Provisioning tools: Terraform, AWS CloudFormation, Google Cloud Deployment Manager, Pulumi
Configuration management tools: Ansible, Chef, Puppet, Saltstack
IACLC

Continual (Best Practice) Phases:
- Version Control
- Collaboration
- Monitoing/Maintenance
- Rollback
- Review + Change
Repeatable (Infra Creation + Config) Phases:
- Design
- Define
- Test
- Provision
- Configure
On Premises IaC
Vagrant
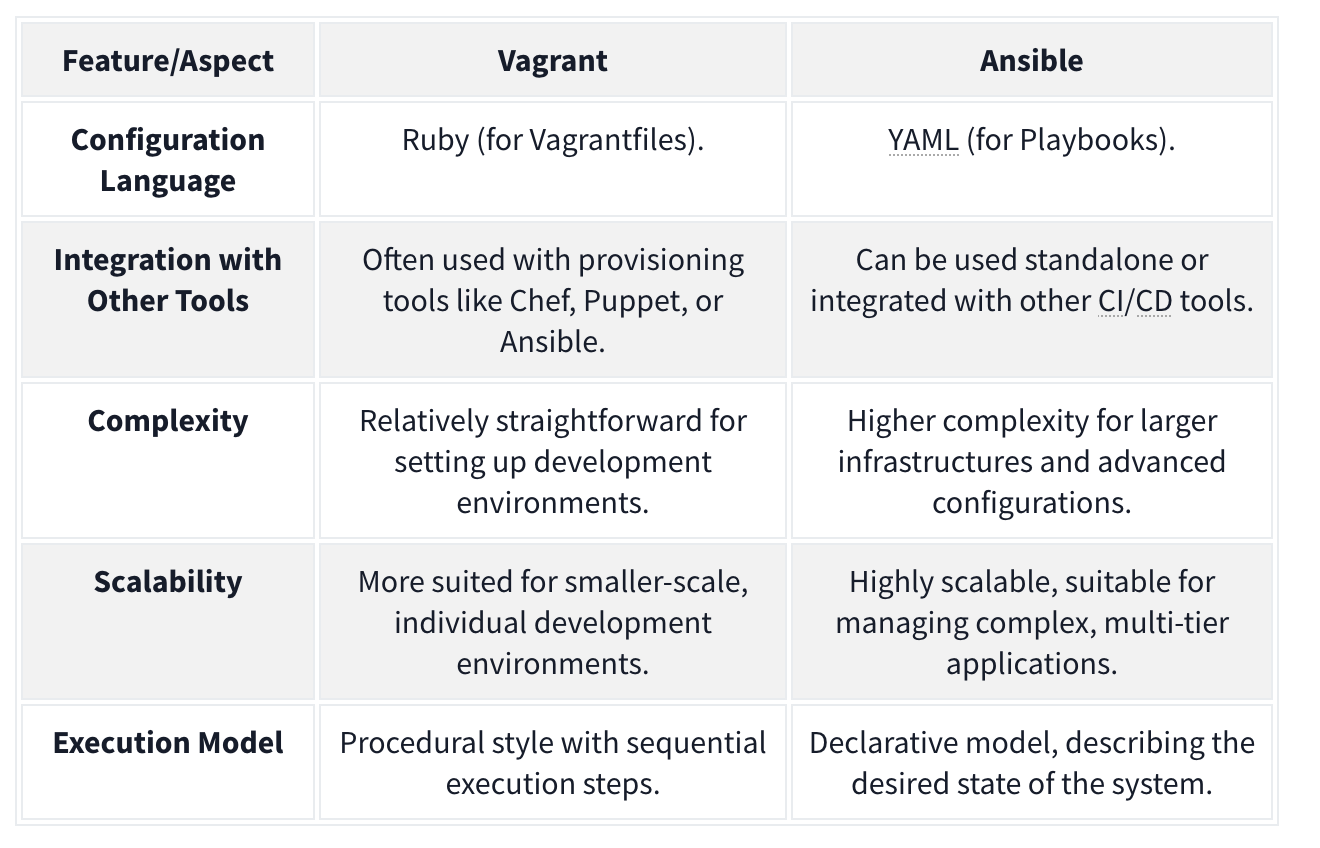
Vagrant - Vagrant is a software solution that can be used for building and maintaining portable virtual software development environments. In essence, Vagrant can be used to create resources from an IaC pipeline. You can think of Vagrant as the big brother of Docker. In the context of Vagrant, Docker would be seen as a provider, meaning that Vagrant could be used to not only deploy Docker instances but also the actual servers that would host them. Terms:
- Provider - A Vagrant provider is the virtualization technology that will be used to provision the IaC deployment. Vagrant can use different providers such as Docker, VirtualBox, VMware, and even AWS for cloud-based deployments.
- Provision - Provision is the term used to perform an action using Vagrant. This can be actions such as adding new files or running a script to configure the host created with Vagrant.
- Configure - Configure is used to perform configuration changes using Vagrant. This can be changed by adding a network interface to a host or changing its hostname.
- Variable - A variable stores some value that will be used in the Vagrant deployment script.
- Box - The Box refers to the image that will be provisioned by Vagrant.
- Vagrantfile - The Vagrantfile is the provisioning file that will be read and executed by Vagrant.
Example Vagrantfile:
Vagrant.configure("2") do |cfg| cfg.vm.define "server" do |config| config.vm.box = "ubuntu/bionic64" config.vm.hostname = "testserver" config.vm.provider :virtualbox do |v, override| v.gui = false v.cpus = 1 v.memory = 4096 end config.vm.network :private_network, :ip => 172.16.2.101 config.vm.network :private_network, :ip => 10.10.10.101 end cfg.vm.define "server2" do |config| config.vm.box = "ubuntu/bionic64" config.vm.hostname = "testserver2" config.vm.provider :virtualbox do |v, override| v.gui = false v.cpus = 2 v.memory = 4096 end #Upload resources config.vm.provision "file", source: "provision/files.zip", destination: "/tmp/files.zip" #Run script config.vm.provision "shell", path: "provision/script.sh" end end - Two servers
- Both using base Ubuntu Bionic x64 image pulled from public repo
- I CPU, 4 GB RAM
If we want to provision the entire script we run
vagrant up, we could just do one server withvagrant up server2.
Ansible
Ansible is another suite of software tools that allows you to perform IaC. Ansible is also open-source, making it a popular choice for IaC pipelines and deployments. One main difference between Ansible and Vagrant is that Ansible performs version control on the steps executed. Terms:
- Playbook - An Ansible playbook is a YAML file with a series of steps that will be executed.
- Template - Ansible allows for the creation of template files. These act as your base files, like a configuration file, with placeholders for Ansible variables, which will then be injected into at runtime to create a final file that can be deployed to the host. Using Ansible variables means that you can change the value of the variable in a single location and it will then propagate through to all placeholders in your configuration.
- Role - Ansible allows for the creation of a collection of templates and instructions that are then called roles. A host that will be provisioned can then be assigned one or more of these roles, executing the entire template for the host. This allows you to reuse the role definition with a single line of configuration where you specify that the role must be provisioned on a host.
- Variable - A variable stores some value that will be used in the Ansible deployment script. Ansible can take this a step further by having variable files where each file has different values for the same variables, and the decision is then made at runtime for which variable file will be used.
Example folder structure:
.
├── playbook.yml
├── roles
│   ├── common
│   │   ├── defaults
│   │   │   └── main.yml
│   │   ├── tasks
│   │   │   ├── apt.yml
│   │   │   ├── main.yml
│   │   │   ├── task1.yml
│   │   │   ├── task2.yml
│   │   │   └── yum.yml
│   │   ├── templates
│   │   │   ├── template1
│   │   │   └── template2
│   │   └── vars
│   │       ├── Debian.yml
│   │       └── RedHat.yml
│   ├── role2
│   ├── role3
│   └── role4
└── variables
  └── var.yml
Example playbook file:
---
- name: Configure the server
  hosts: all
  become: yes
  roles:
    - common
    - role3
  vars_files:
    - variables/var.yml
- uses the
var.ymlfile to overwrite any default variables commonandrole3roles wherever the playbook is applied
Example main.yml file which would be overwritten:
---
- name: include OS specific variables
  include_vars: "{{ item }}"
  with_first_found:
    - "{{ ansible_distribution }}.yml"
    - "{{ ansible_os_family }}.yml"

- name: set root password
  user:
    name: root
    password: "{{ root_password }}"
  when: root_password is defined

- include: apt.yml
  when: ansible_os_family == "Debian"

- include: yum.yml
  when: ansible_os_family == "RedHat"

- include: task1.yml
- include: task2.yml
- If the host is Debian, we will execute the commands specified in the
apt.ymlfile. If the host is RedHat, we will execute the commands specified in theyum.ymlfile.
Combining Ansible and Vagrant
For example, Vagrant could be used for the main deployment of hosts, and Ansible can then be used for host-specific configuration. This way, you only use Vagrant when you want to recreate the entire network from scratch but can still use Ansible to make host-specific configuration changes until a full rebuild is required. Ansible would then run locally on each host to perform these configuration changes, while Vagrant will be executed from the hypervisor itself. In order to do this, you could add the following to your Vagrantfile to tell Vagrant to provision an Ansible playbook:
config.vm.provision "ansible_local" do |ansible|
    ansible.playbook = "provision/playbook.yml"
    ansible.become = true
end
On-Premises Code Final Challenge
ssh -L 80:172.20.128.2:80 entry@10.10.245.213 when 172.20.128.2 is the remote web server, and 10.10.245.213 is the server we have ssh access too.
- This means we can access 172.20.128.2:80 on 127.0.0.1:80.
Flag1:
- Forward that port and then access the signin page. On that signin page there is a testDB button which you can press and capture the request to see that there is a command being sent to the server. Capture it and use nc to get a shell. You can find the flag quickly. Flag 2:
- Navigate to /vagrant/keys, capture and ssh key, then use it from the machine you ssh’d into initally to ssh into the 172.20.128.2 machine as root (
ssh -i id_rsa root@172.20.128.2) and you can see the flag immediately. Flag 3: Then you can justfind / -type f -name flag3-of-4.txt 2>/dev/nulland find that it is in/tmp/datacopy/flag3-of-4.txt. That is where the shares are provisioned.
Flag 4: Note that the authorized_keys simply contains the public keys of the allowed ssh users. We also should note at this point that the /tmp/datacopy directory on this machine is the same as the /home/ubuntu file on the original machine, only this time we have write access. So we can echo "$mysshkey >> authorized_keys and then use that to ssh ubuntu@10.10.245.213. Then we can sudo su and grab the flag from /root.
Cloud-Based IaC
Terraform is an infrastructure as code tool used for provisioning that allows the user to define both cloud and on-prem resources in a human-readable configuration file that can be versioned, reused and distributed across teams.
Terraform Architecture
Terraform Core: Terraform Core is responsible for the core functionalities that allow users to provision and manage their infrastructure using Terraform. Note that Terraform is declarative, meaning that the tool supports versioning and change-tracking practices. Takes input from two sources:
- Terraform Config Files: Where the user defines what resources make up their desired architecture
- State: Keeps track of the current state of provisioned infrastructure. The core component checks this state file against the desired state defined in the config files, and, if there are resources that are defined but not provisioned (or the other way around), makes a plan of how to take the infrastructure from its current state to the desired state.
- Called
terraform.tfstateby default.
- Called
- Provider: Providers are used to interact with cloud providers, SaaS providers and other APIs.
Configurations and Terraform
Terraform config files are written in a declarative language called HCL (HashiCorp Configuration Language) that is human-readable. Example of a simple AWS VPC:
provider "aws" {
 region = "eu-west-2"
}

# Create a VPC
resource "aws_vpc" "flynet_vpc" {
 cidr_block = "10.0.0.0/16"
 tags = {
  Name = "flynet-vpc"
 }
}
- creates an “aws_vpc” called “flynet_vpc”
- Note that this begins the resource block.
- The arguments given will depend on the defined resource
Resource Relationships
Sometimes, resources can depend on other resources. For example, to allow SSH from any source within the VPC, you have this in your config file:
resource "aws_security_group" "example_security_group" {
 name = "example-security-group"
 description = "Example Security Group"
 vpc_id = aws_vpc.flynet_vpc.id #Reference to the VPC created above (format: resource_type.resource_name.id)

 # Ingress rule allowing SSH access from any source within the VPC
 ingress {
  #Since we are allowing SSH traffic , from port and to port should be set to port 22
  from_port = 22
  to_port = 22
  protocol = "tcp"
  cidr_blocks = [aws_vpc.flynet_vpc.cidr_block]
 }
}
Infrastructure Modularization
Because Terraform is modular, it can be broken down and defined as modular components. See this same tfconfig directory:
tfconfig/
 -flynet_vpc_security.tf #resources can be paired up and defined in separate modular files
 -other_module.tf
 -variables.tf #if values are used across modules, it makes sense to paramaterize them in a file called variables.tf. These variables can then be directly referenced in the .tf file.
 -main.tf #main.tf acts as the central configuration file where the defined modules are all referenced in one place
If we define a variable like:
variable "vpc_cidr_block" {
 description = "CIDR block for the VPC"
 type = string #Set the type of variable (string,number,bool etc)
 default = "10.0.0.0/16" # Can be changed as needed
}
We can reference it later as var.vpc_cidr_block.
Finally, this module (and all other module tf files) would be collected and referenced in the main.tf file.
Terraform Workflow
The Terraform workflow generally follows four steps: Write, Initialize, Plan and Apply.
When we get started:
- Write: defined the desired state in config file
- Initialize: The
terraform initcommand prepares your workspace (the working directory where your Terraform configuration files are) so Terraform can apply your changes.- This includes downloading dependencies
- Plan: Plan changes considering current state vs desired state using
terraform plan. - Apply: Apply the actions in the plan using
terraform apply. Terraform works out the order automatically.
When making changes:
- Initialize:
terraform initshould be the first command run after making any changes to an infrastructure configuration - Plan:
terraform planis not required but is best practice because it shows what will be removed and added, catching misconfigurations. - Apply: Apply the actions in the plan using
terraform apply.Terraform works out the order automatically.- The state file will then be updated to reflect that the current state now matches the desired state as the additional component has been added/provisioned.
Future:
Destroy: terrafrom destroy
CloudFormation
CloudFormation is an Amazon Web Services (AWS) IaC tool for automated provision and resource management.
- Declarative - you express the desired state of your infrastructure using a JSON or YAML template. This template defines the resources, their configurations, and the relationships between them.
- A CloudFormation template is a text file that serves as a blueprint for your infrastructure. It contains sections that describe various AWS resources like EC2 instances, S3 buckets. The resources created forms a CloudFormation stack. They represent a collection of AWS resources that are created, updated, and deleted together.
- These are defined in the template:
- AWSTemplateFormatVersion
- Description
- Resources - This includes EC2 instances or S3 buckets. Each resource has a logical name (MyEC2Instance, MyS3Bucket). Type indicates the AWS resource type. Properties hold configuration settings for the resource.
- Outputs: This section defines the output values displayed after creating the stack. Logical name, description, and a reference to a resource using
!Ref.
Architecture
CloudFormation employs a main-worker architecture. The main (…master), typically a CloudFormation service running in AWS, interprets and processes the CloudFormation template. It manages the overall stack creation, update, or deletion orchestration. The worker nodes, distributed across AWS regions, are responsible for carrying out the actual provisioning of resources.
Template Processing Flow
- Template Submission: users submit a CloudFormation template, written in JSON or YAML, to the CloudFormation service.
- Template Validation: the CloudFormation service validates the submitted template to ensure its syntax is correct and it follows AWS resource specifications.
- Processing by the Main Node: the main node processes the template, creating a set of instructions for resource provisioning and determining the order in which resources should be created based on dependencies.
- Resource Provisioning: the main node communicates with worker nodes distributed across different AWS regions. Worker nodes carry out the actual provisioning.
- Stack Creation/Update: the resources are created or updated in the specified order, forming a stack.
CloudFormation is event-driven, can perform rollbacks (with triggers if configured), and supports cross-stack references, allowing resources from one stack to refer to resources in another.
CloudFormation templates support “intrinsic functions”, including referencing resources, performing calculations, and conditionally including resources. Ex:
Resources:
  MyInstance:
    Type: AWS::EC2::Instance
    Properties:
      ImageId: ami-12345678
      InstanceType: t2.micro

Outputs:
  InstanceId:
    Value: !Ref MyInstance

  PublicDnsName:
    Value: !GetAtt MyInstance.PublicDnsName

  SubstitutedString:
    Value: !Sub "Hello, ${MyInstance}"
- Fn::Ref : References the value of the specified resource.
- Fn::GetAtt : Gets the value of an attribute from a resource in the template.
- Fn::Sub : Performs string substitution.
Terraform vs CloudFormation
- CloudFormation is AWS-only, but well integrated and supported with other AWS services.
- Use Cases: Deep AWS Integration and Managed Service Integration
- Terraform is cloud-agnostic, has a large and active community, use a state file to track current state of infrastructure and has greater language flexibility with HCL rather than JSON or YAML only.
- Use Cases: Multi-Cloud environments and Community Modules and Providers
Secure IaC
For Both CloudFormation and Terraform
- Version Control: store IaC code in version control systems like Git to track changes, facilitate collaboration, and maintain a version history.
- Least Privilege Principle: always assign the least permissions and scope for credentials and IaC tools. Only grant the needed permissions for the actions to be performed.
- Parameterize Sensitive Data: Use parameterization to handle credentials or API keys and avoid hardcoding secrets directly into the IaC code.
- Secure Credential Management: leverage the cloud platform’s secure credential management solutions or services to securely handle and store sensitive information, e.g., vaults for secret management.
- Audit Trails: enable logging and monitoring features to maintain an audit trail of changes made through IaC tools. Use these logs to conduct reviews periodically.
- Code Reviews: implement code reviews to ensure IaC code adheres to best security practices. Collaborative review processes can catch potential security issues early.
For CloudFormation:
- Use IAM Roles: Assign Identity and Access Management (IAM) roles with the minimum required permissions to CloudFormation stacks. Avoid using long-term access keys when possible.
- Secure Template Storage: store CloudFormation templates in an encrypted S3 bucket and restrict access to only authorized users or roles.
- Stack Policies: implement stack policies to control updates to stack resources and enforce specific conditions during updates.
For Terraform:
- Backend State Encryption: enable backend state encryption to protect sensitive information stored in the Terraform state file.
- Use Remote Backends: store the Terraform state remotely using backends like Amazon S3 or Azure Storage. This enhances collaboration and provides better security.
- Variable Encryption: consider encrypting sensitive values using tools like HashiCorp Vault or other secure key management solutions.
- Provider Configuration: Securely configure provider credentials using environment variables, variable files, or other secure methods.